WooWBot Mobile App Using Ionic FrameWork
- Created: 02/08/2018
- Latest update: 02/08/2018
- Created by: Web Design and Web Development Company QuantumCloud
- eMail: quantumcloud@gmail.com
Thank you for purchasing our item. If you have any questions that are beyond the scope of this help file, please feel free to email us. We truly hope our plugin increases the value of your website!
ABOUT
WooWBot Mobile App Using Ionic FrameWork
Using WooWBot Mobile App Ionic package you can easily build native ANDROID and IOS app which can be submitted to Google play app store and Apple app store.
WooWBot Mobile App Using Ionic FrameWork
- Full features of WooWBot WooCommerce Chat Bot Pro in Mobile app
- Push Notification features using oneSignal.
INSTALLATION and OVERVIEW of FEATURES
Enable Mobile App Pages in Your WordPress Backend:
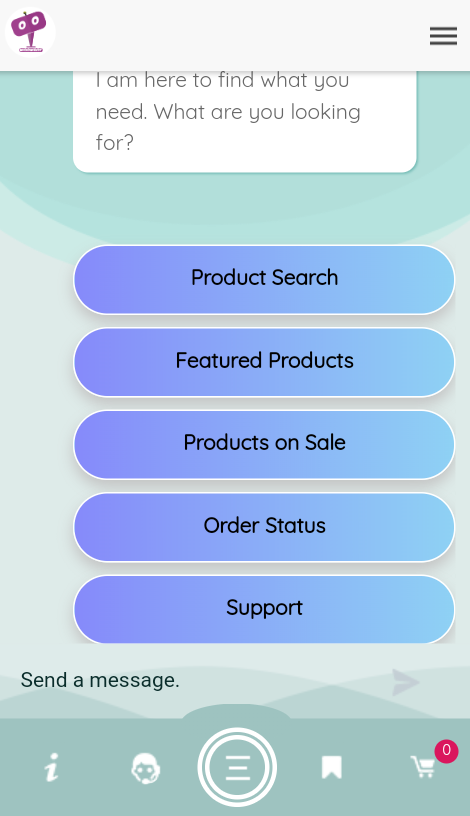
Go to WoowBot Pro->Mobile App and activate Create pages for WooWBot Mobile. Following pages will be created to use in WoowBot Android or IOS Mobile App.
- WoowBot Mobile App
- WoowBot App Checkout
- WoowBot App Order Thank You
IONIC Build
Using NMP package manger, after installing nodejs on your machine, you have to install ionic and cordova as
-
use
npm install -g cordova ionic -
Now need to create a blank ionic project using
ionic start myApp blank
In the project folder you will find src, now replace it with our src folder.
App CONFIGURATION
In the src/assets/config.ts file have to change
-
with Your WordPress Installation URL
return 'http://dev.quantumcloud.com/woowbot'; -
WordPress website pages
return [ {title: 'About us', slug:'contact-us'}, ] -
REST API Prefix
return 'wp-json'; -
OneSignal App ID & Firebase FCM senderId for push notification.
 return {
oneSignalAppId:"103ef989-1f28-4510-928f-011b2a89a5a4",
fcmSenderId: "692260439502"
}
Follow instructions for Push Notifications:
- oneSignal Docs at https://documentation.onesignal.com/docs/dashboard
- For Android app : https://documentation.onesignal.com/v4.0/docs/generate-a-google-server-api-key
- For IOS app : https://documentation.onesignal.com/v4.0/docs/generate-an-ios-push-certificate
App information at config.xml
Icon and Splash
You need to change the icon.png and splash.png media file from src/resources with your brand icon and splash.
APP BUILDING
Testing your app in the browser with ionic serve or with an emulator is fast, easy and convenient when your app is in development, but eventually you’re going to have to test on a device. Not only is it the only way to accurately test how your app will behave and perform, many Ionic Native plugins will only work when they are run on actual hardware.
Android Devices
Deploying to an Android device is a fairly straightforward process. If you have a working Android development environment, you’re ready to go.
Requirements
- Java JDK
- Android Studio
- Updated Android SDK tools, platform and component dependencies. Available through Android Studio’s SDK Manager
Running Your App
To run your app, all you have to do is enable USB debugging and Developer Mode on your Android device, then run ionic cordova run android --device from the command line.
This will produce a debug build of your app, both in terms of Android and Ionic’s code
Enabling USB debugging and Developer Mode can vary between devices, but is easy to look up with a Google search. You can also check out Enabling On-device Developer Options in the Android docs.
Production Builds
To run or build your app for production, run
ionic cordova run android --prod --release
		# or
		ionic cordova build android --prod --release
This will minify your app’s code as Ionic’s source and also remove any debugging capabilities from the APK. This is generally used when deploying an app to the Google Play Store.
Sign Android APK
If you want to release your app in the Google Play Store, you have to sign your APK file. To do this, you have to create a new certificate/keystore.
Let’s generate your private key using the keytool command that comes with the JDK:
keytool -genkey -v -keystore my-release-key.jks -keyalg RSA -keysize 2048 -validity 10000 -alias my-alias
You’ll first be prompted to create a password for the keystore. Then, answer the rest of the nice tools’s questions and when it’s all done, you should have a file called my-release-key.jks created in the current directory.
Note: Make sure to save this file somewhere safe, if you lose it you won’t be able to submit updates to your app!
To sign the unsigned APK, run the jarsigner tool which is also included in the JDK:
jarsigner -verbose -sigalg SHA1withRSA -digestalg SHA1 -keystore my-release-key.jks android-release-unsigned.apk my-alias
This signs the APK in place. Finally, we need to run the zip align tool to optimize the APK. The zipalign tool can be found in /path/to/Android/sdk/build-tools/VERSION/zipalign. For example, on OS X with Android Studio installed, zipalign is in ~/Library/Android/sdk/build-tools/VERSION/zipalign:
zipalign -v 4 android-release-unsigned.apk HelloWorld.apk
To verify that your apk is signed run apksigner. The apksigner can be also found in the same path as the zipalign tool:
apksigner verify HelloWorld.apk
Now we have our final release binary called HelloWorld.apk and we can release this on the Google Play Store for all the world to enjoy!
All steps can also be found here: Android SDK docs
iOS Devices
Unlike Android, iOS developers need to generate a provisioning profile to code sign their apps for testing. The good news is that, as of iOS9, you can develop and test your apps on your iOS device without a paid Apple Developer account. This is particularly great for developers who want to try out mobile development with Ionic, since it saves the cost but still provides a lot of the features of having a full Apple Developer account. For a full breakdown of the features included, check out Apple’s docs.
Requirements
- Xcode 7 or higher
- iOS 9
- A free Apple ID or paid Apple Developer account
Creating a Provisioning Profile
To start, you’ll need to set up a provisioning profile to code sign your apps.
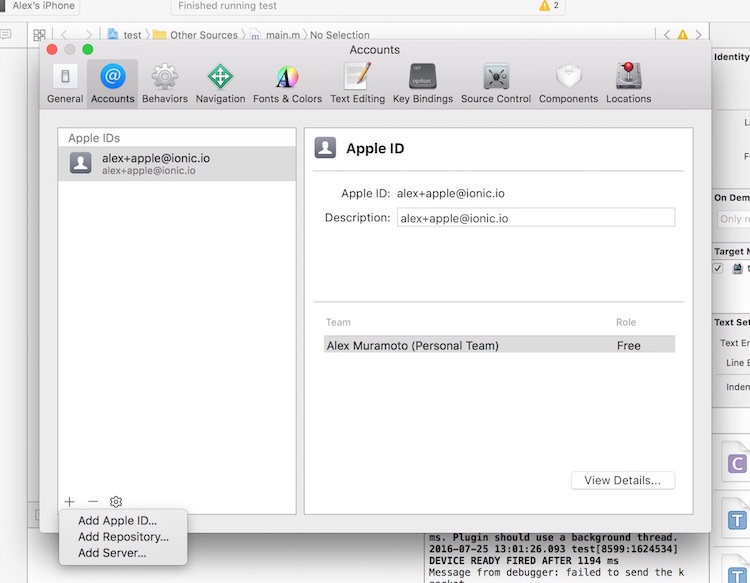
Using an Apple ID
- Open Xcode preferences (Xcode > Preferences…)
- Click the ‘Accounts’ tab
- Login with your Apple ID (+ > Add Apple ID…)
Once you’ve successfully logged in, a new ‘Personal Team’ with the role ‘Free’ will appear beneath your Apple ID.
Using an Apple Developer Account
Creating a provisioning profile with a paid Apple Developer account is a little bit more involved. For full instructions, check out Launching Your App on Devices in the Apple Developer docs.
Running Your App
- Run a production build of your app with
ionic cordova build ios --prod - Open the
.xcodeprojfile inplatforms/ios/in Xcode - Connect your phone via USB and select it as the run target
- Click the play button in Xcode to try to run your app
Oops, code signing error! No problem.
Code Signing Your App
Next, you’ll need to code sign your app. How you do this will depend on if you are running Xcode 8 or an earlier version.
Xcode 7 and Earlier
If you are running Xcode 7 or earlier, you’ll get a code signing error that looks like this when you try to run the app:
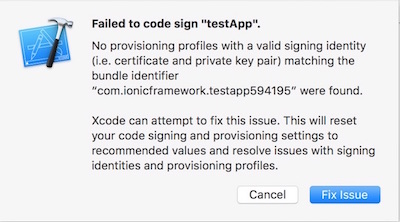
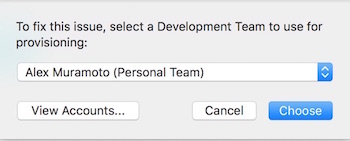
Click the ‘Fix Issue’ button, then select your ‘Personal Team’ profile.
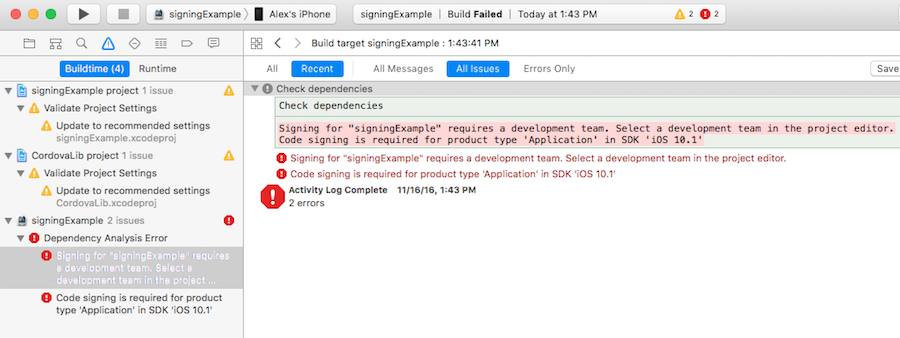
Xcode 8
If you are running Xcode 8, the code signing error will appear as a buildtime error, rather than as a pop-up:
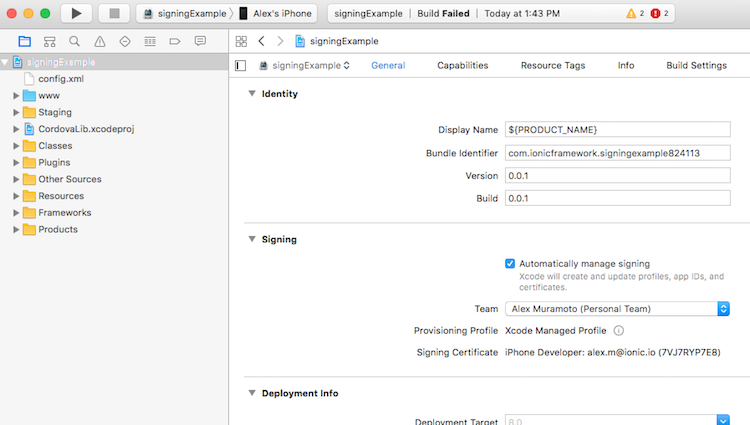
To select the certificate to sign your app with, do the following:
- Go to the ‘Project Editor’ by clicking the name or your project in the ‘Project Navigator’
- Select the ‘General’ section
- Select the team associate with your signing certificate from the ‘Team’ dropdown in the ‘Signing’ section
Trusting the Certificate
Once you’ve code signed your app, you should get a launch error that looks like this. On Xcode 7 and below you’ll see this automatically. On Xcode 8 it will appear the next time you try to run the app:
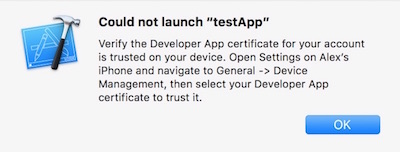
To get past this, we have to tell our iOS device to trust the certificate we code signed our app with:
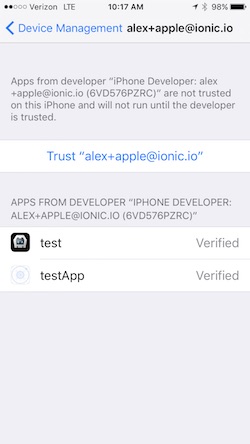
- Open the ‘Settings’ app on your iOS device
- Go to ‘General > Device Management’. You’ll see the email address associated with the Apple ID or Apple Developer account you used to code sign your app.
- Tap the email address
- Tap ‘Trust <your_email>’:
Now, go back to Xcode and hit that play button or run ionic cordova run ios --device from the command line to install and launch your app on your iOS device.
SUPPORT
To get instant support, you can email us at: quantumcloud@gmail.com
Any feedback or feature requests are most welcome. We will try to incorporate your valuable suggestions with our item.