WoowBot WooCommerce Chat Bot Pro
Introduction
- Item Name : WoowBot WooCommerce Chat Bot
- Author : QuantumCloud
First of all, Thank you so much for purchasing this plugin and for being our loyal customer. You are awesome!
To get priority support, please open a support ticket with us.
Any feedback or feature requests are most welcome. We will try to incorporate your valuable suggestions with our item.
About
WoowBot is a Plug n’ Play, Intelligent ChatBot or Shopping Bot for WooCommerce that can Increase your store sales perceptibly. This WordPress ChatBot plugin can converse fluidly with the Shoppers – thanks to the Integration with Google‘s Natural Language Processing (NLP) & Artificial Intelligence and provide the help and support they need.
WoowBot works based on two types of user intents as user inputs.
- Predefined intents ( Product Search, Catalog, Featured Products, Sale Products, Order Status, Support, Call Me, Send Feedback). These intents can work without integration to DialogFlow API and AI.
- Custom intents gives you the option to build a truly human like, intelligent and comprehensive chatbot. Build any type of Intents and Responses (including rich text responses) directly in DialogFlow and train the bot accordingly. When you create custom intents and responses in DialogFlow, WoowBot will display them when user inputs match with the Custom Intents along with the responses you created. You can also build Rich responses by enabling Facebook messenger Response option.
What Does This Chat Bot Do?
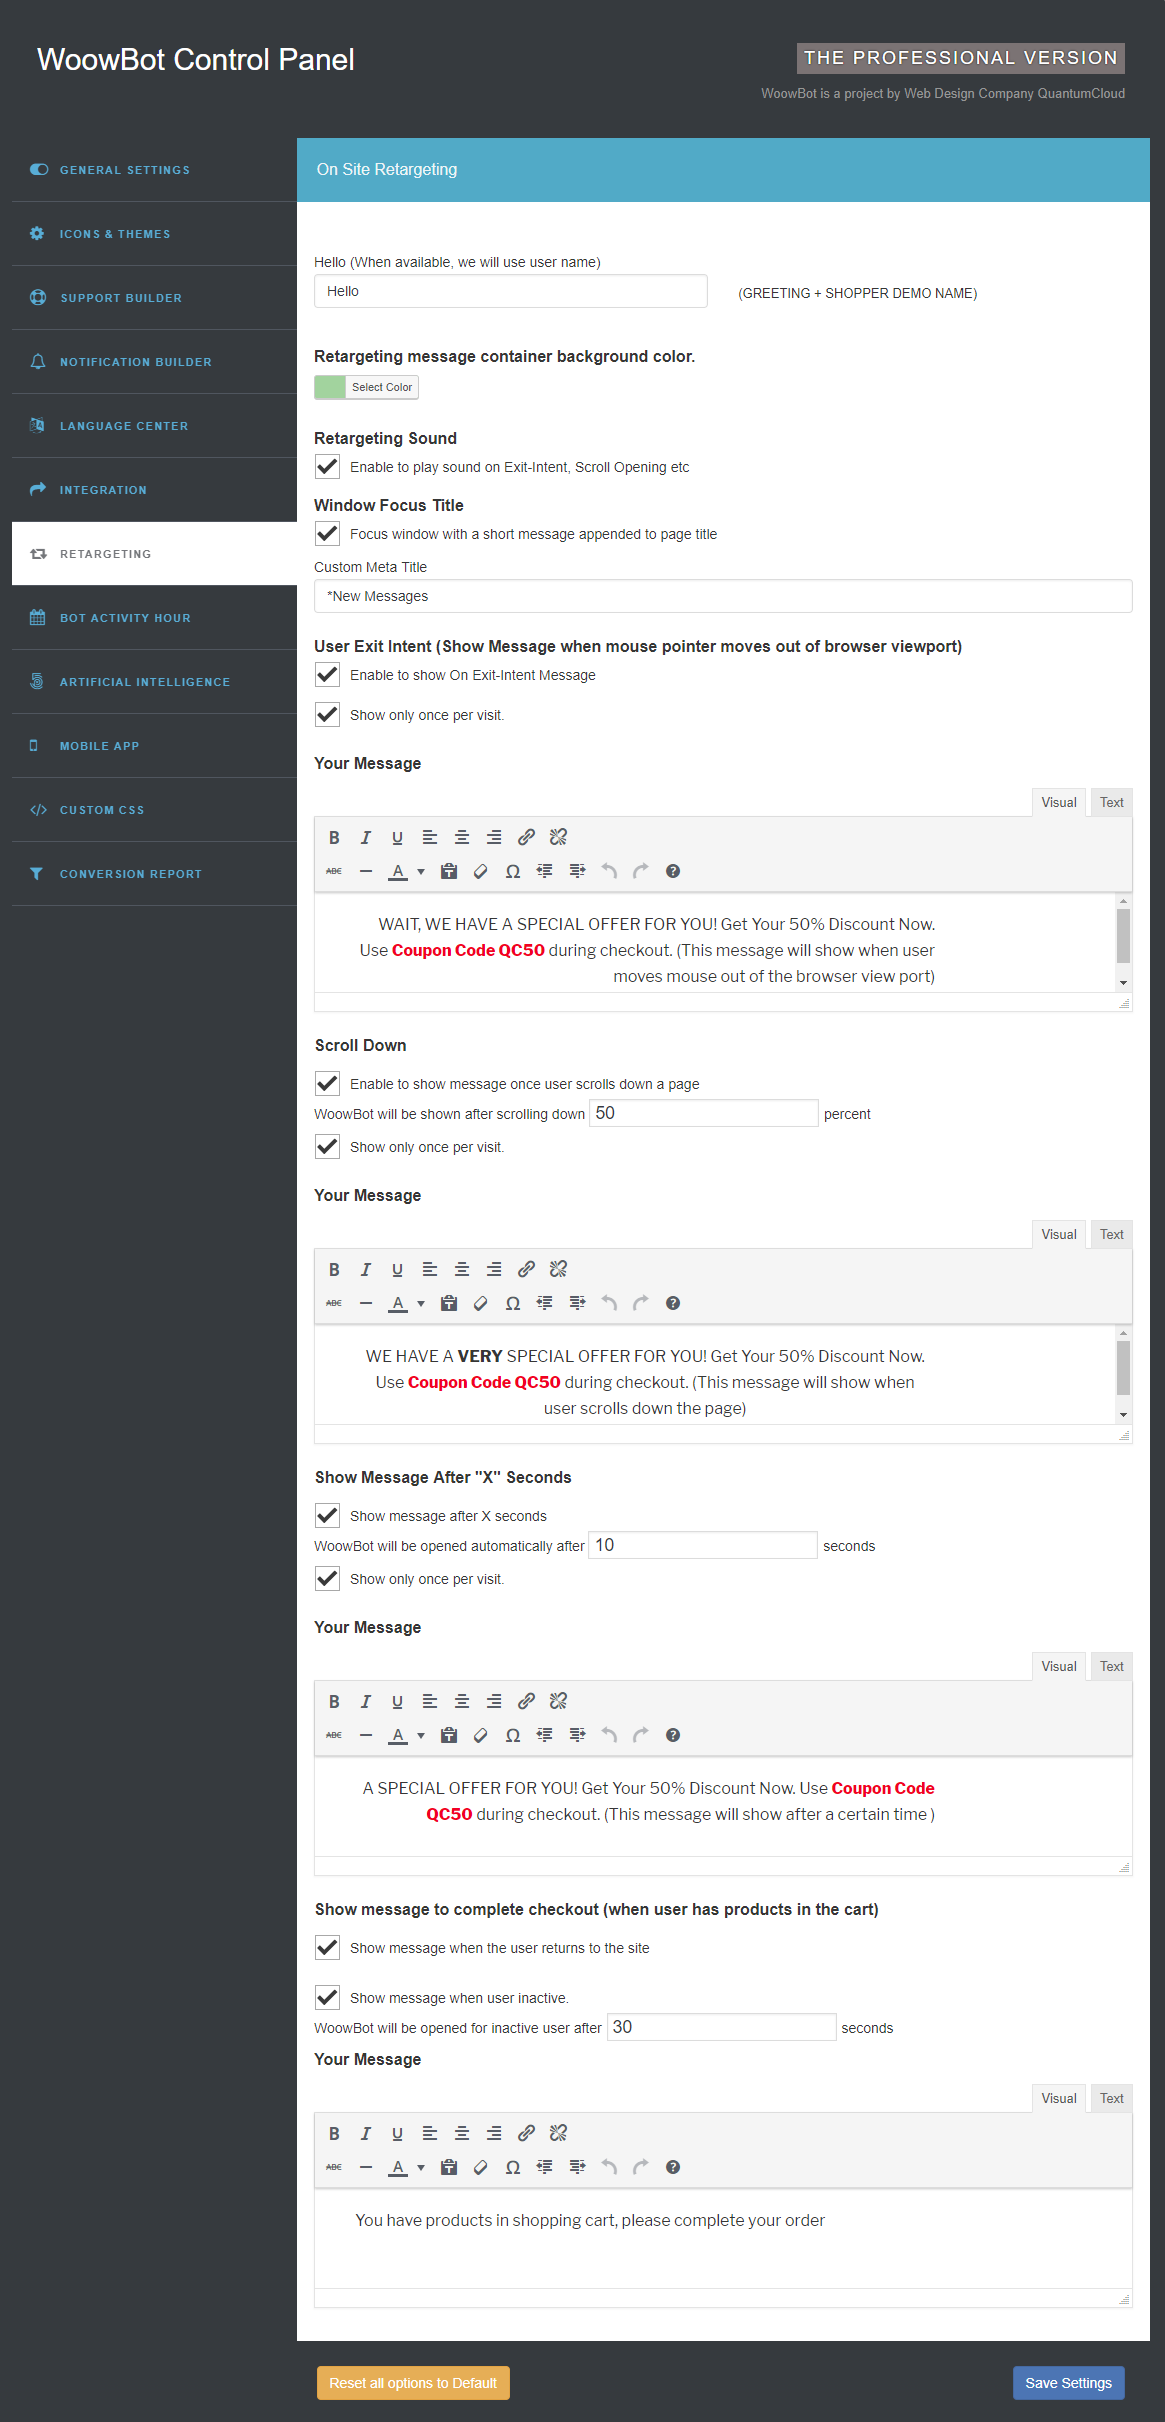
WoowBot is a Plug n’ play, Stand Alone WooCommerce Shopping Chat Bot that can help Increase your store Sales. Shoppers can converse fluidly with the Bot – thanks to the Integration with Google‘s Natural Language Processing (AI and NLP), Search and Add products to the cart directly from the chat interface and get Support. The Onsite Retargeting helps your Conversion rate optimization by showing special offers and coupons on Exit Intent, time interval or page scroll-down inside the ChatBot window. Track Customer Conversions with statistics to find out if shoppers are abandoning carts without completing orders. Get more sales!
Installation And Overview Of Features
You can install "WoowBot-woocommerce-chatbot-pro" plugin by following some simple and easy steps.
Please find 'WoowBot-woocommerce-chatbot-pro.zip' file inside your downloaded package and install it following the steps below: -
From your WordPress dashboard:
- Visit 'Plugins > Add New'
- Click on 'Upload'
- Click on 'Browse' button and then select 'WoowBot-woocommerce-chatbot-pro.zip' from file upload window
- Then click 'Install Now' button. The plugin will be installed within some moments.
- Then click 'Activate Plugin' link to activate the installed 'WoowBot WooCommerce Chat Bot Pro' plugin.
Manual Installation:
- 'Upload / Copy' 'WoowBot-woocommerce-chatbot-pro.zip' file to your 'wp-content\plugins' folder
- Unzip the 'WoowBot-woocommerce-chatbot-pro.zip' file
- Visit 'Plugins -> Installed Plugins' from your site dashboard
- Find 'WoowBot WooCommerce Chat Bot Pro' in the plugins list, and activate it by clicking on 'Activate' link
Important: follow the upgrade section if you want to upgrade your plugin from free version to premium version.
HOW TO UPGRADE FROM FREE VERSION
To upgrade your "WoowBot WooCommerce Chat Bot Pro" plugin from FREE version to PREMIUM version please follow the below steps:
- Download the latest pro version of the plugin from website
- Log in to your WordPress admin area and go to the Plugins management page.
- Deactivate and Delete the old version of the plugin .
- Upload and Activate the latest pro version of the plugin
- You are done.
Getting Started
After installing 'WoowBot WooCommerce Chat Bot Pro' plugin, you can configure the plugin as below -
Simple Steps to get Started:
- After you have installed the plugin, a new menu named "WoowBot Pro" will appear in the WordPress admin Menu list.
- Click "WoowBot Pro" to open up setting page.
- The settings page contains different tabs packed with various setting options.
- Check out these video tutorials for a jump start:
Check These Video Tutorials We Created To Give You A Jump Start!
Getting Started with WoowBot WooCommerce Chat Bot Pro
How to add artificial intelligence natural language processing (NLP) to WordPress chatbot WoowBot
Onsite retargeting with Chatbot WoowBot
How to Integrate Facebook Messenger Live Chat with ChatBot Woowbot
1. GENERAL SETTINGS
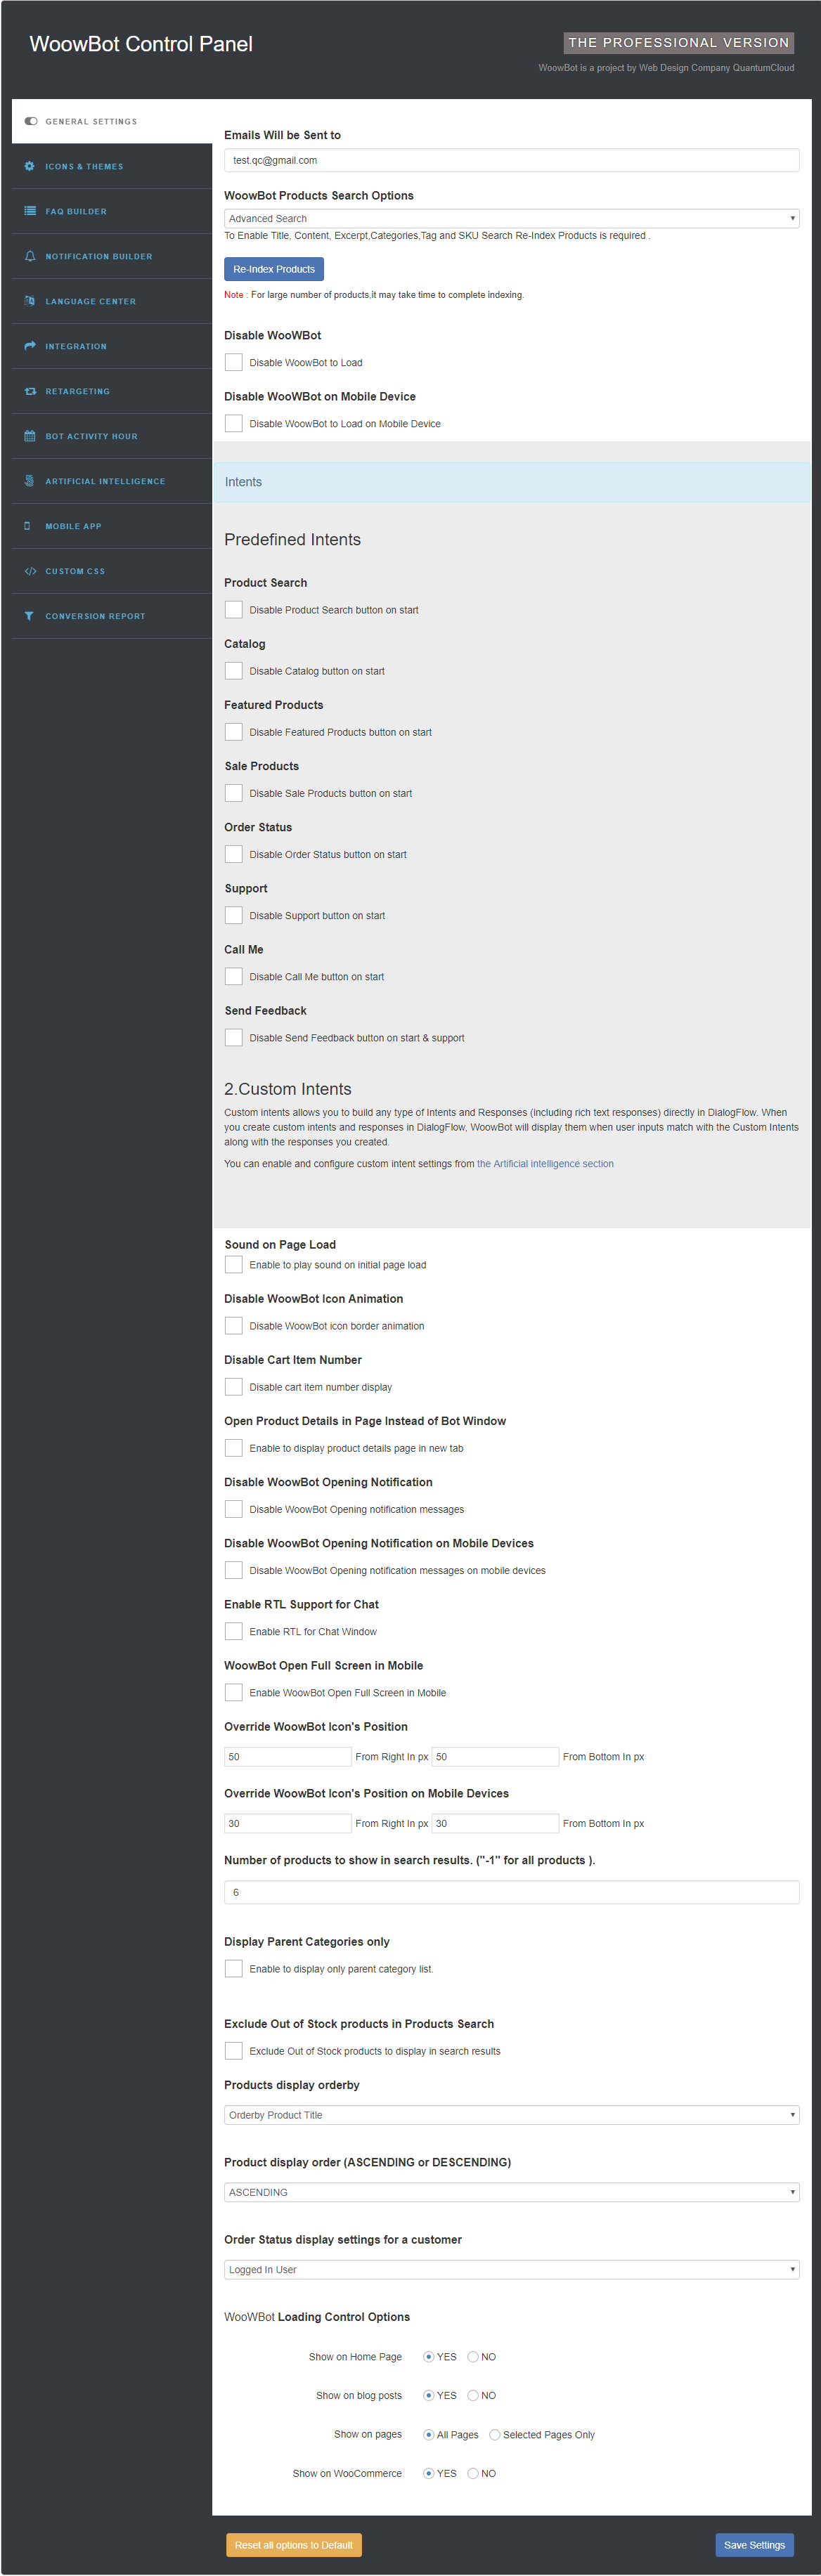
- Disable WoowBot to load - enable this feature if you want to disable WoowBot across the whole website.
- Disable WoowBot on Mobile Device - enable to Disable WoowBot to Load on Mobile Device
- Disable WoowBot Icon Animation - enable this feature if you want to disable WoowBot icon animation on load and click on it.
- Disable Cart Item Number - enable this feature if you don't want to show cart item numbers on WoowBot icon.
- Disable Product Search - enable to don't display Product Search button on start.
- Disable Featured Products - enable to don't display Featured Products button on start.
- Disable Sale Products - enable to don't display Sale Products button on start.
- Disable Order Status - enable to don't display Order Status button on start.
- Open Product Details in Page Instead of Bot Window - Enable to display product details page in new tab.
- Disable WoowBot Opening Notification - enable to don't display on WoowBot Opening notification messages.
- Enable RTL Support for Chat - Enable RTL for Chat Window
- Override WoowBot Icon's Position - To move WoowBot icon and chat window on the view port of device give value in pixel.
-
WoowBot Products Search Optionstwo search modes-
- Standard Search mode: Standard products search is the default Woocommerce standard product search feature.
- Advanced Search mode: To Enable Title, Content, Excerpt, Categories, Tag and SKU Search Re-Indexing the Products is required. note : for large number of products, it may take few minutes to complete indexing.
- Number of products to show in search results. ("-1" for all products ) : To display products per page (per request) for product search, product categories, featured products and product on sale etc.
- Display Parent Categories only - Enable to display only parent category list.
- Display Sub Category after Parent Category - Enable to display Sub Category after Parent Category.
- Exclude Out of Stock products in Products Search - Exclude Out of Stock products to display in search results
- Products display orderby For product search, product list will be sorted as selected from - Product Title, Orderby Date, Orderby Modify, Orderby Comments Number, Orderby Random & Orderby None etc.
- Product Disply order (ASCENDING or DESCENDING) for product search product list will be sorted as selected from - ASCENDING or DESCENDING.
- Order Status Display Settings for a Customer to show orders made by shopper. Admin can choose option to show this for Logged In Users(recommended) only and Without User Login (with order number).
- WoowBot Loading Control Options To load WoowBot on specific pages and area (by
default YES to all).
- Show on Home Page To show only on Home page
- Show on Blog Posts To show on blog or articles page of WordPress.
- Show on Pages To show on WordPress pages (by default to All Pages ). if want to show on specfic pages then change radio button to Selected Pages Only and check mark on the pages and hit on the Save Settings
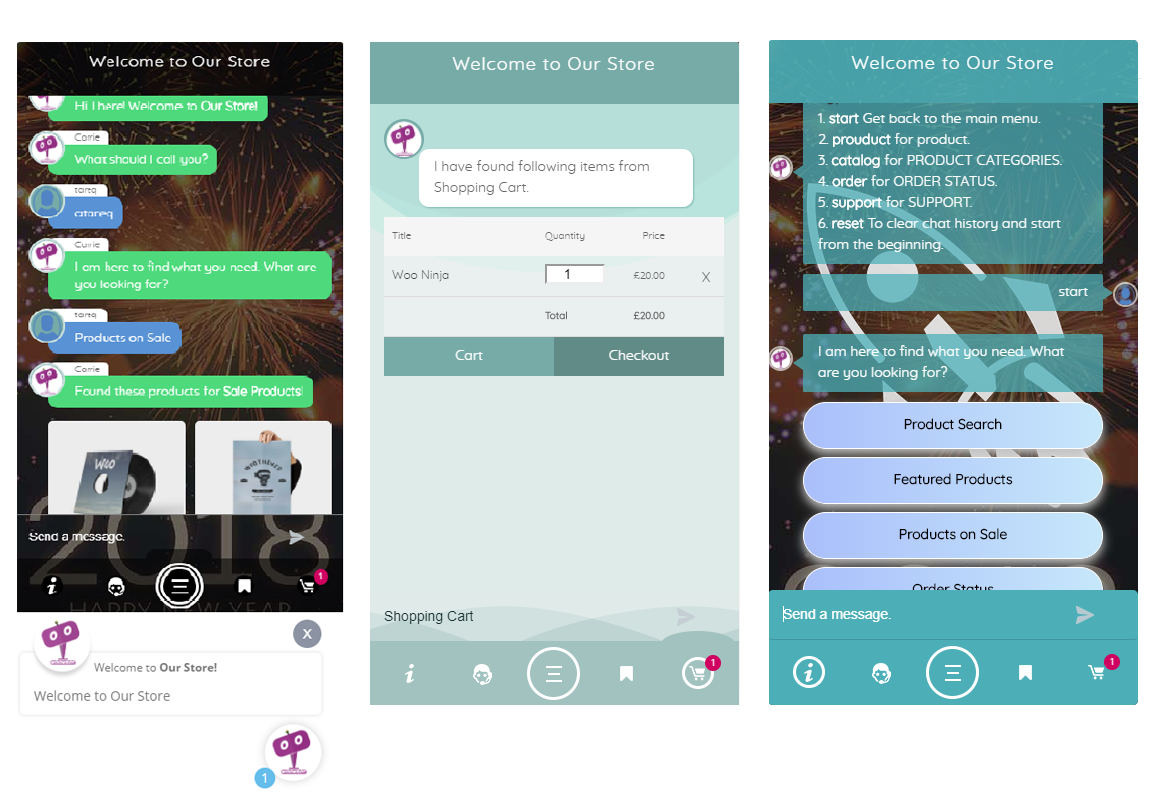
2. ICONS & THEMES
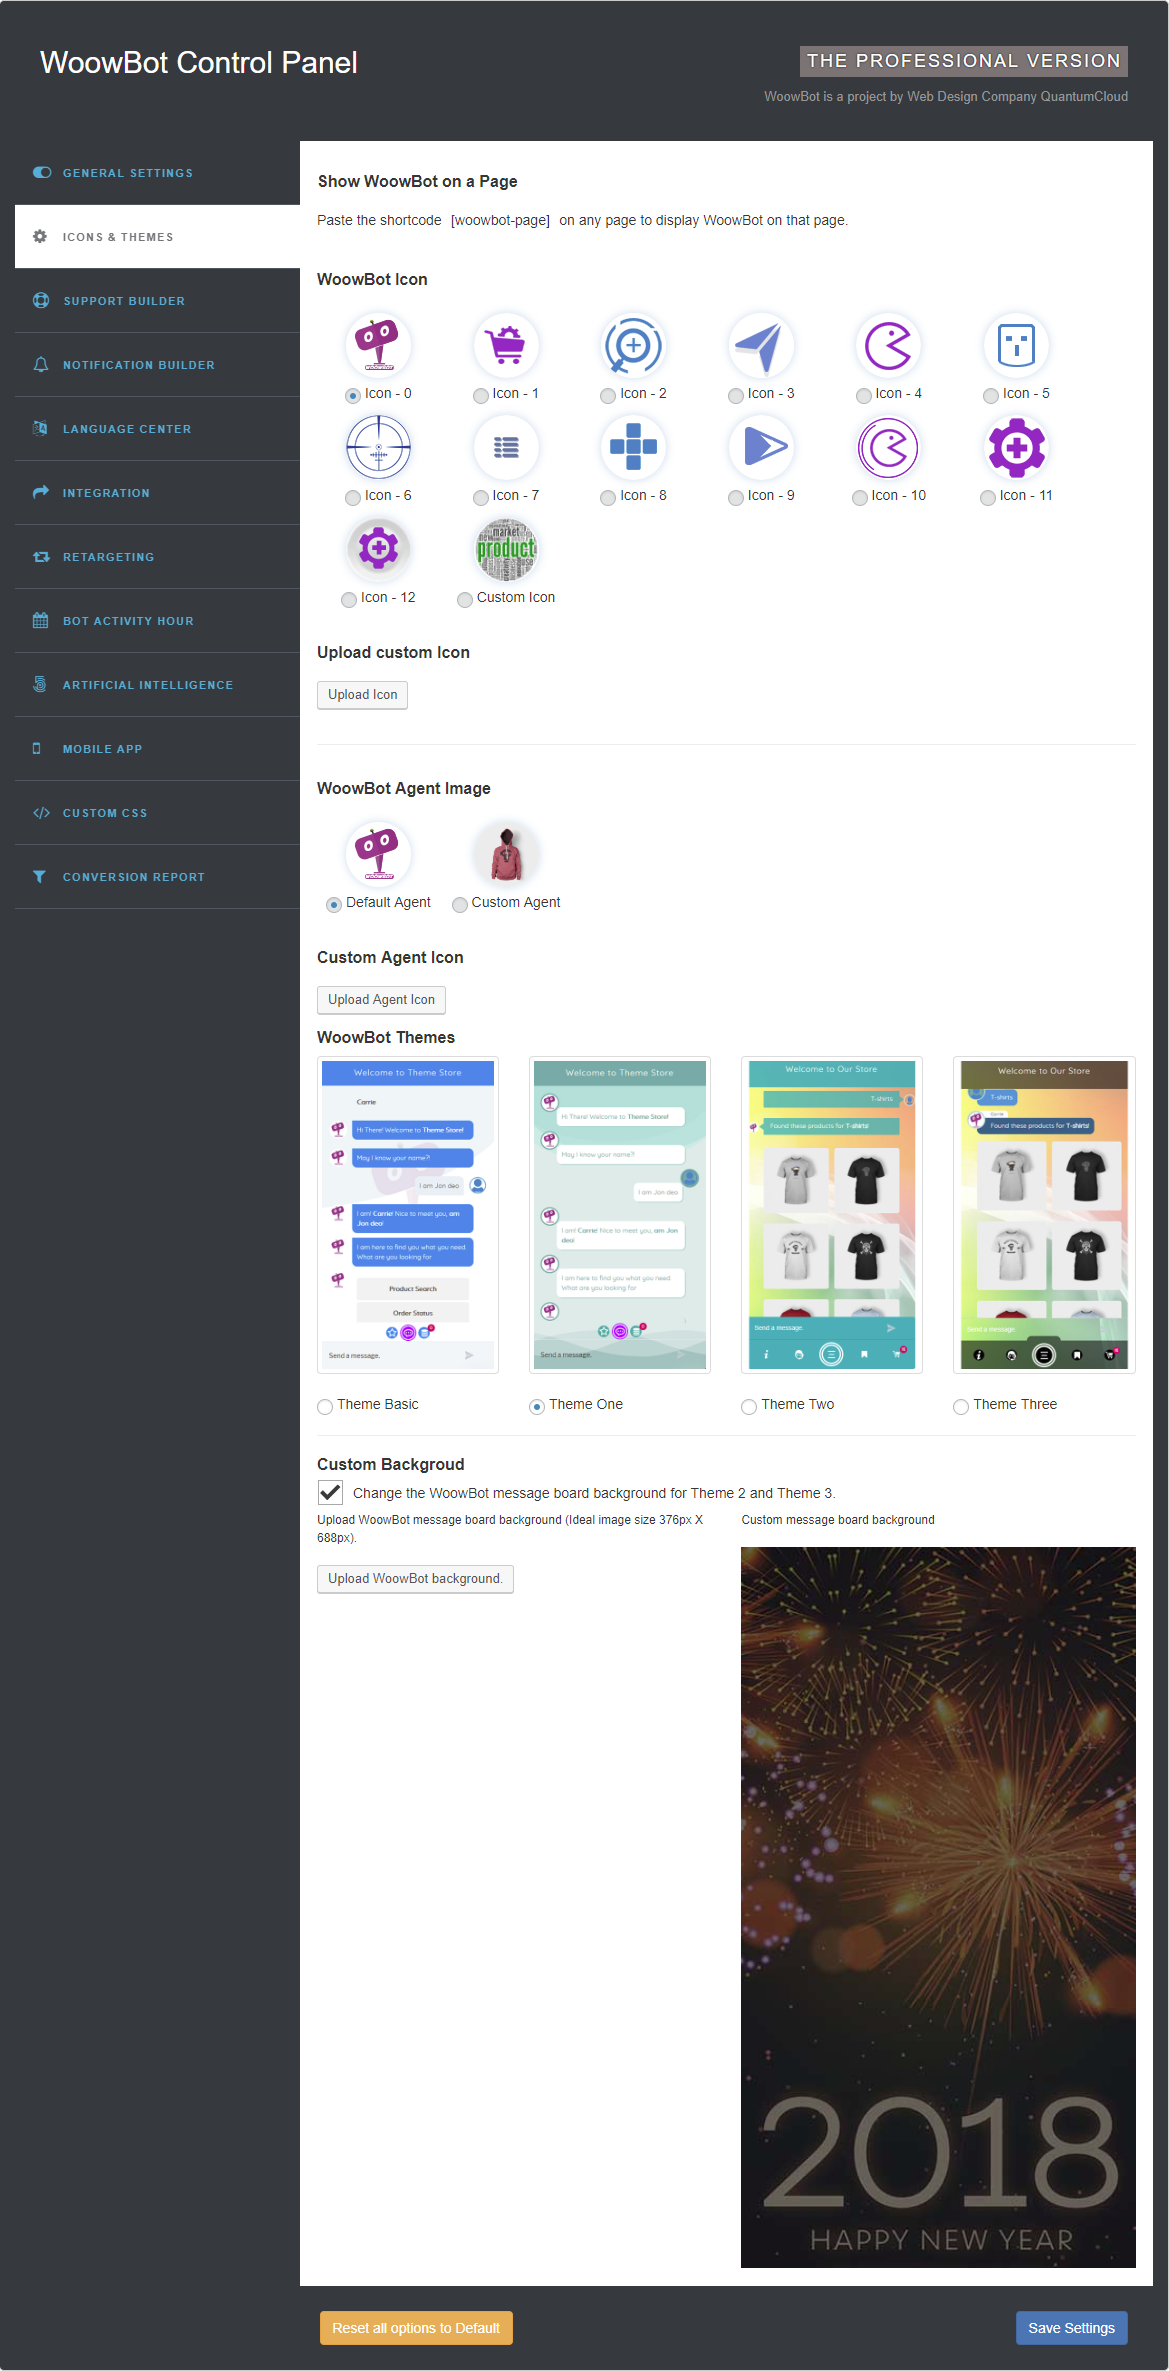
- WoowBot WooCommerce Chat Bot Pro comes with a set of WoowBot icons preinstalled but you can upload your own 2 agent icons and 4 different themes. You can choose any agent icon or upload your own and switch between any themes any time.
- Upload custom Icon To set an custom WoowBot icon, click on upload custom icon and upload it using WordPress Media Manager
- WoowBot Cutom Agent Image To set a Custom Agent Icon, click on upload custom Agent icon and upload it using WordPress Media Manager
- Custom Backgroud for theme 2 & theme 3 To set a Custom background checkmarck and Change the WoowBot message board background for Theme 2 and Theme 3. and upload custom background image using WordPress Media Manager. **note : WoowBot chat board background image's ideal size is 376px X 688px).
3. FAQ BUILDER

- In the FAQ builder section, Admin can add questions and answers by clicking on Add More Questions and Answers button and remove any previous questions by clicking on the red cross button.
4. NOTIFICATION BUILDER

- Notification message will be shown on top of the WoowBot Icon.
- Interval between notifications (in Seconds). put the value. Click on Add button to create message and hit on the Save Settings to save messages.
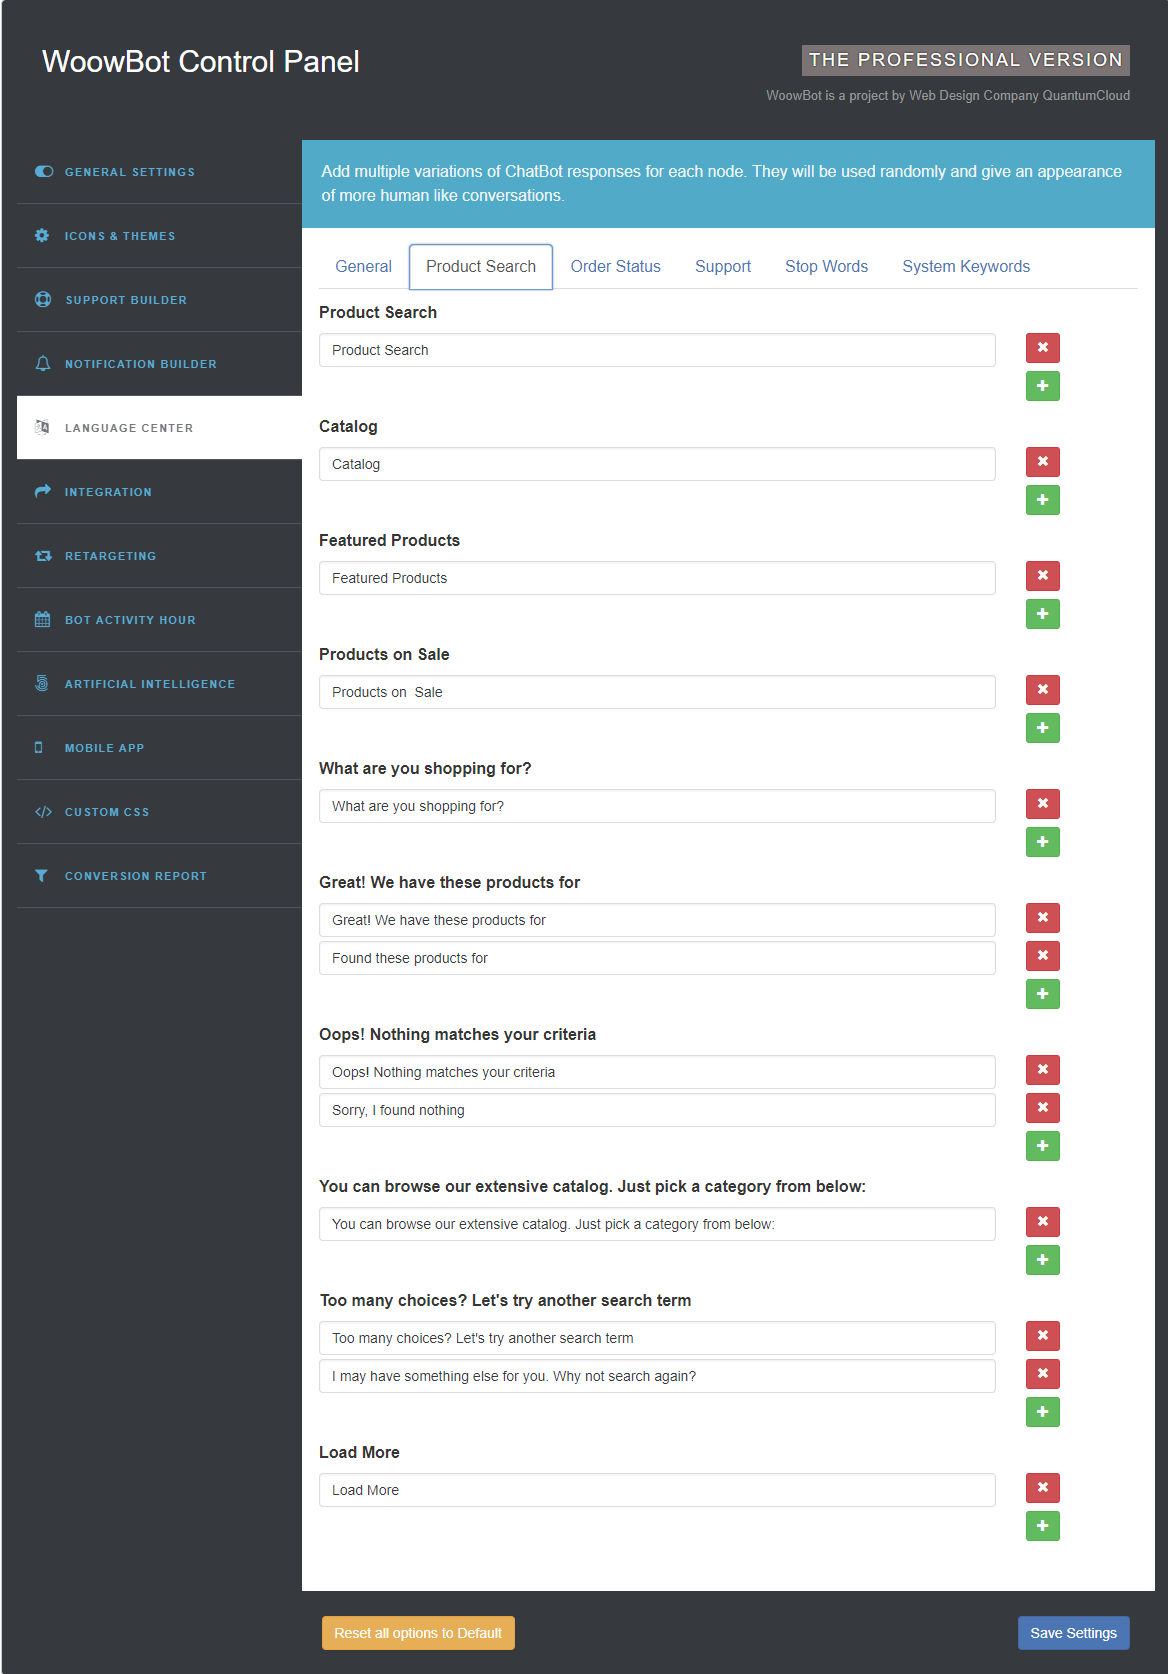
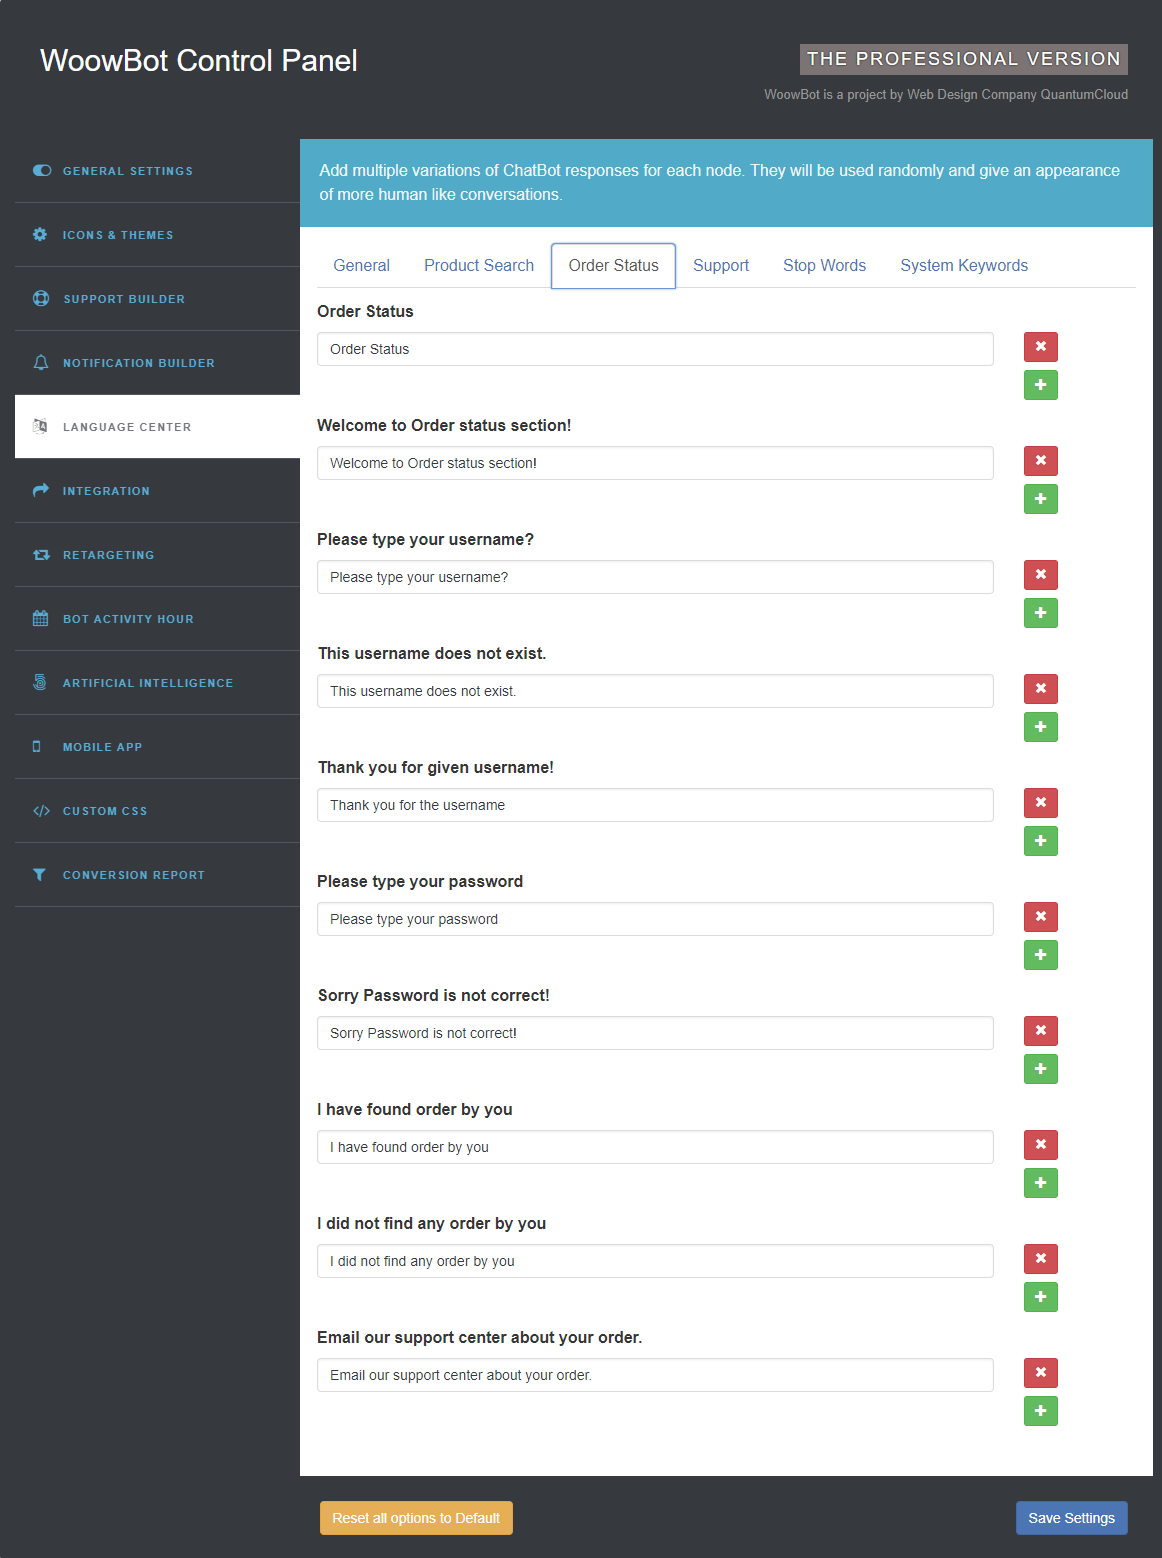
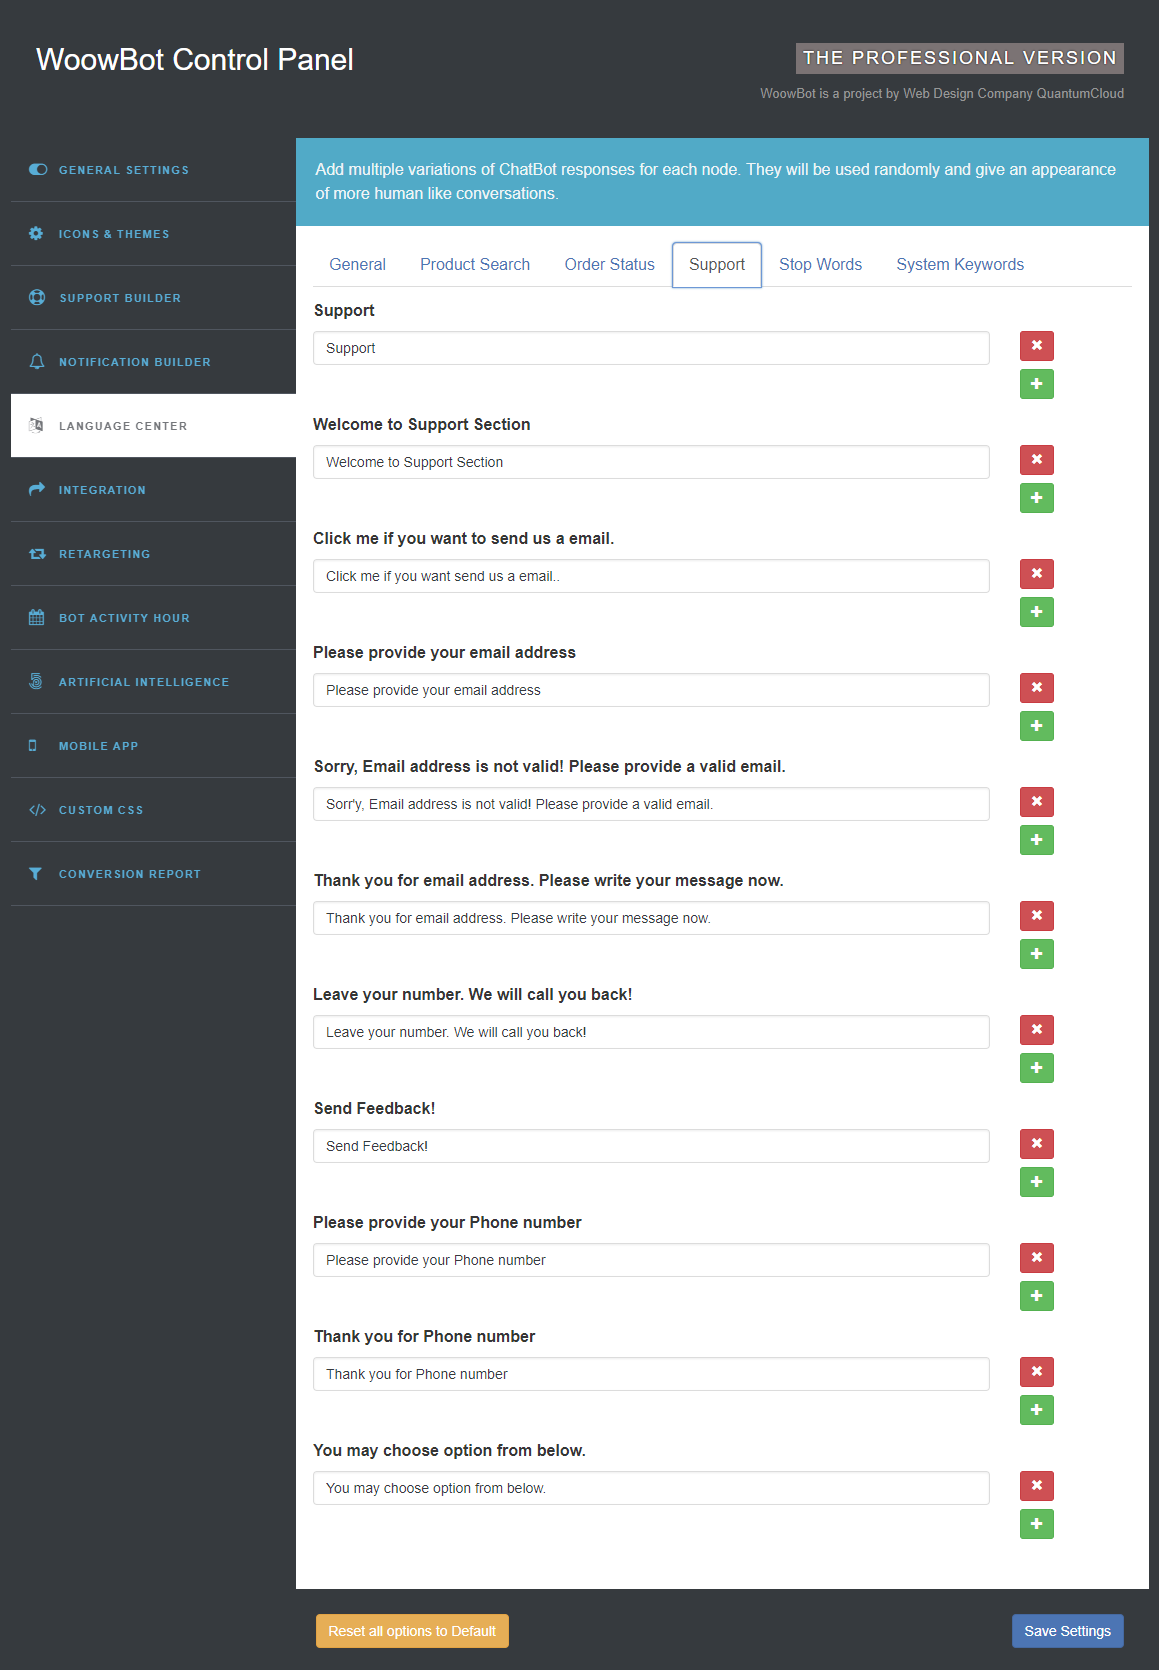
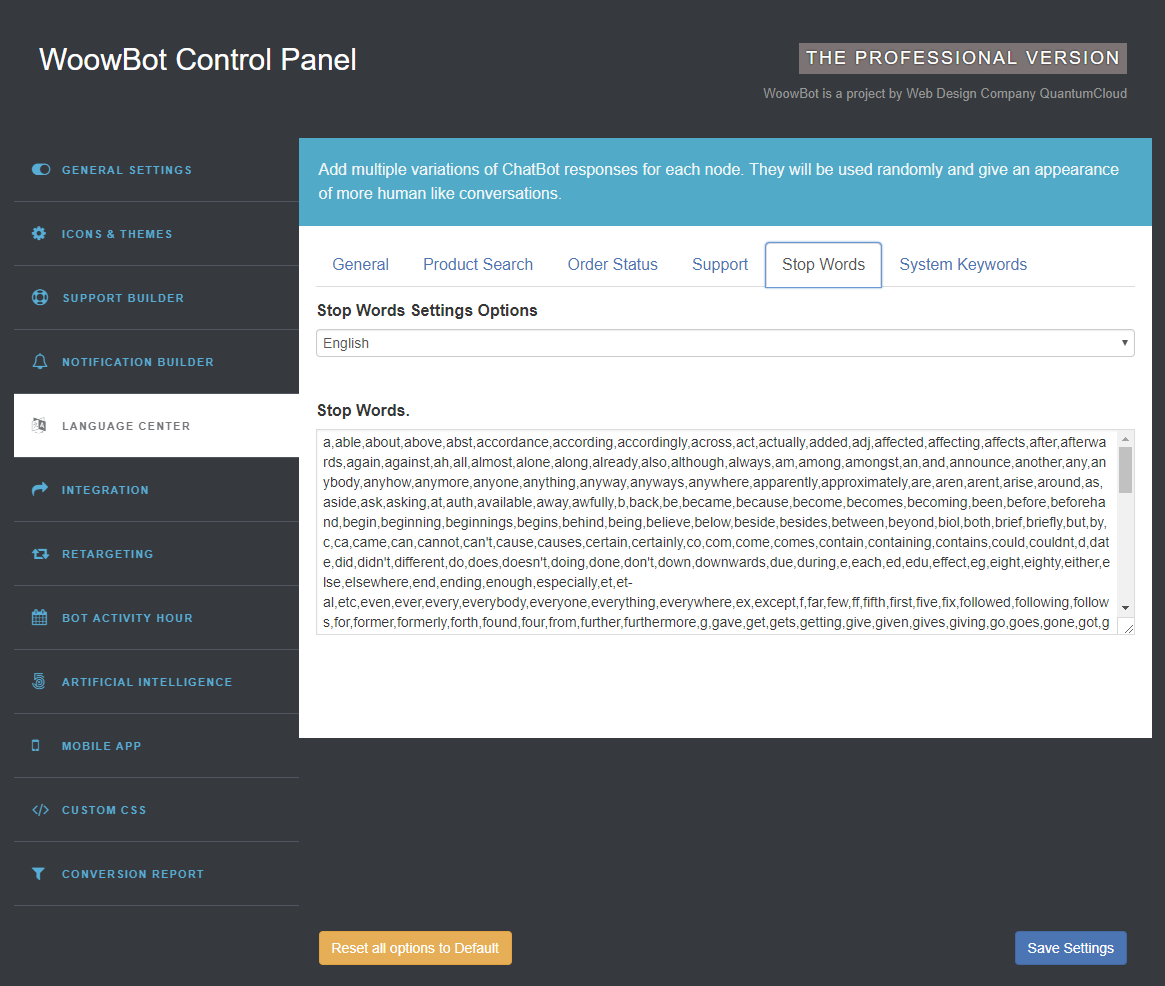
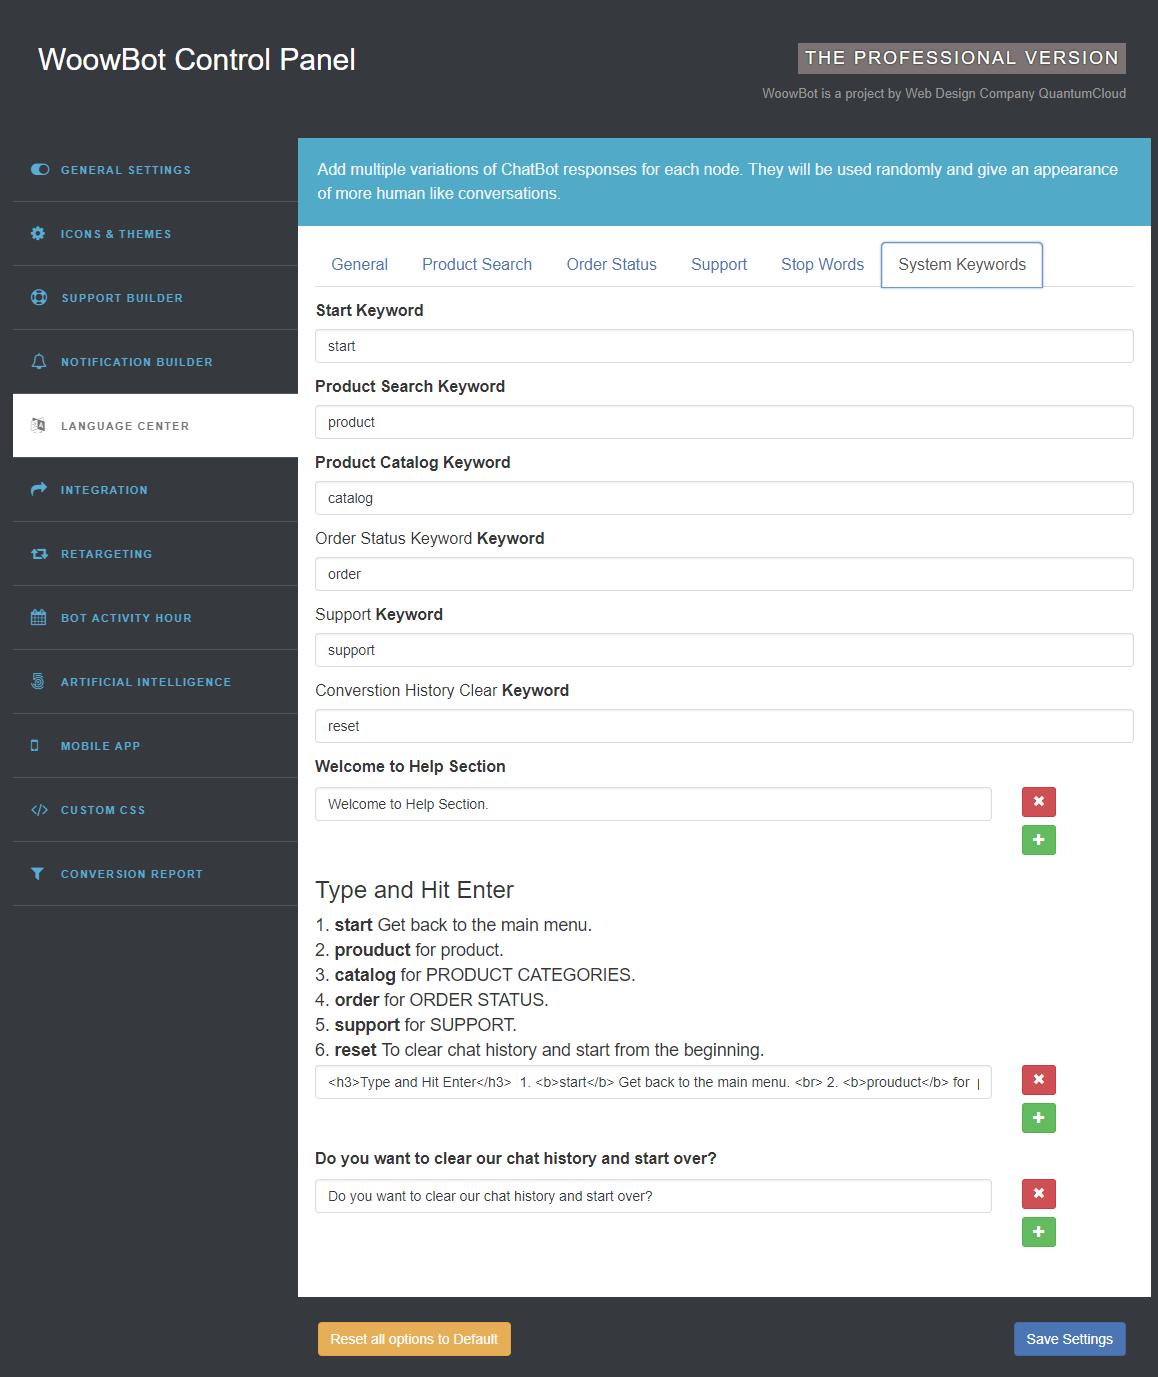
5. LANGUAGE CENTER
All WoowBot responses can be controlled through the Language Center. You can add multiple variations of messages for each node. They will be used randomly and give an apperance of more human like responses. It has been divided into six tabs.
5.1.General
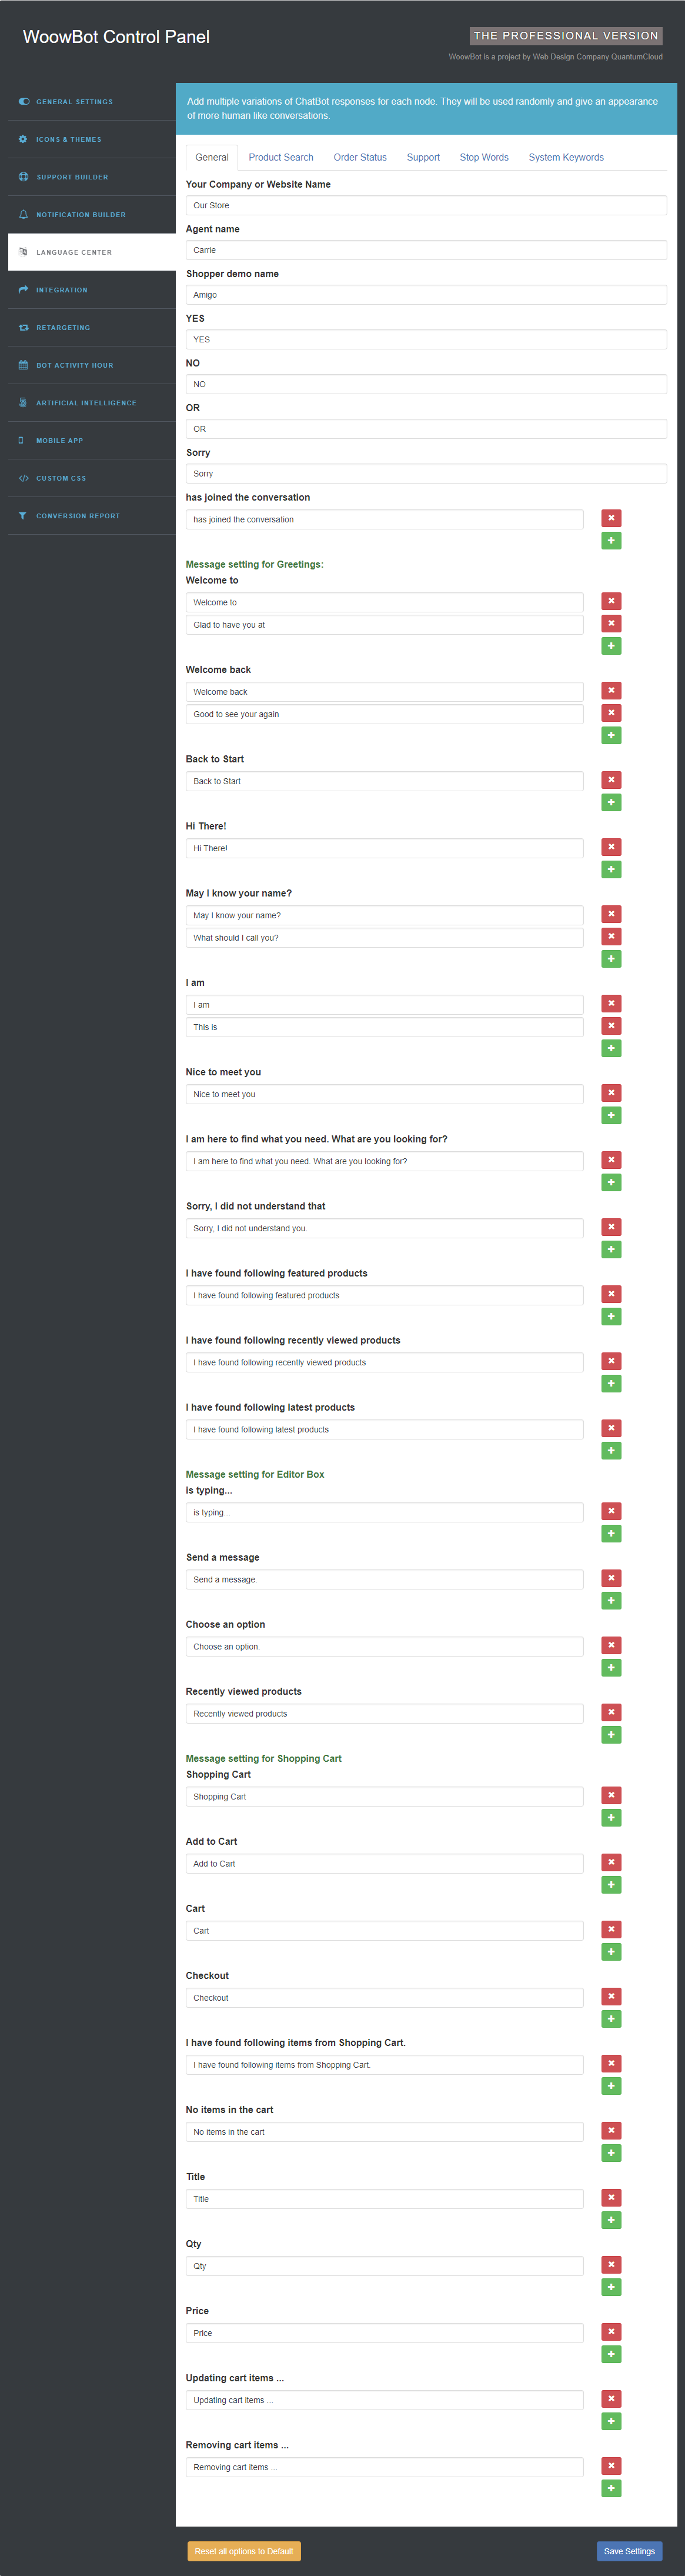
- When you are done, then click on Save Settings button to save your settings.
5.2.Product Search
5.3.Order Status
5.4.Support
5.5.Stop Words
5.6.System Keywords
6. INTEGRATION
WoowBot allow below listed 3rd party messaging & chating application, web link and phone in Integration section. You can add and remove even control to show or hide these application.
6.1.Facebook Messenger
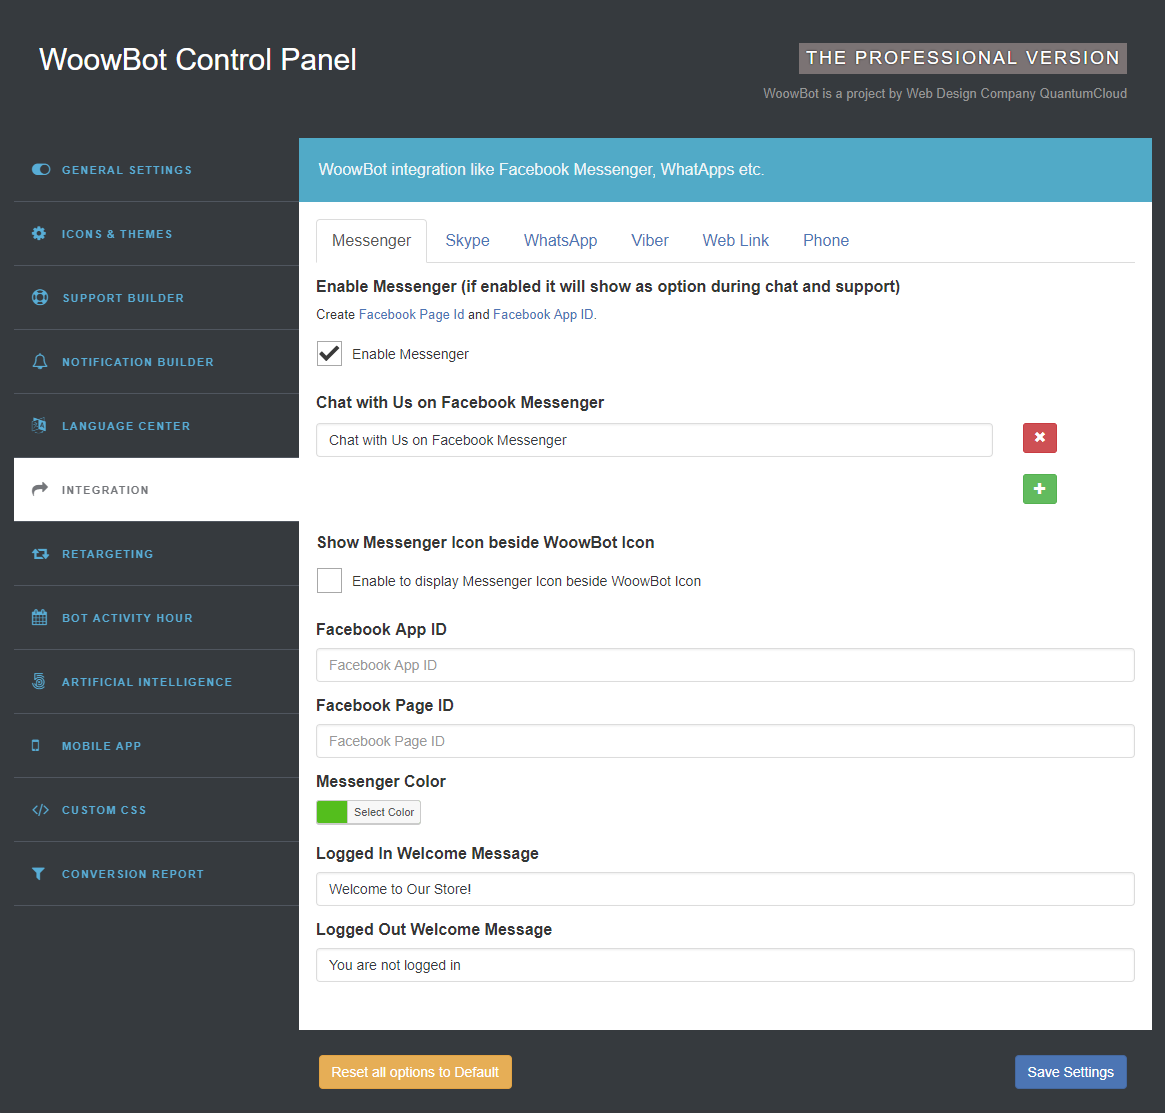
- To enable Messenger application you need a Facebook Page and Facebook App
- To control Messanger you use
- Enable Messenger
- Show Messenger Icon beside WoowBot Icon
- Facebook App ID
- Facebook Page ID
- Messenger Color
- Logged In Welcome Message
- Logged Out Welcome Message
6.2.Skype

- Need Skype account id to enable on WoowBot.options are
- Show Skype Floating Icon on WoowBot Message Board Border
- Skype ID
6.3.WhatsApp

- Need WhatsApp Phone number to enable on WoowBot.Find WhatsApp
phone number for settings.
- Show WhatsApp Icon on WoowBot Message Board Border
- WhatsApp Phone Number
6.4.Viber
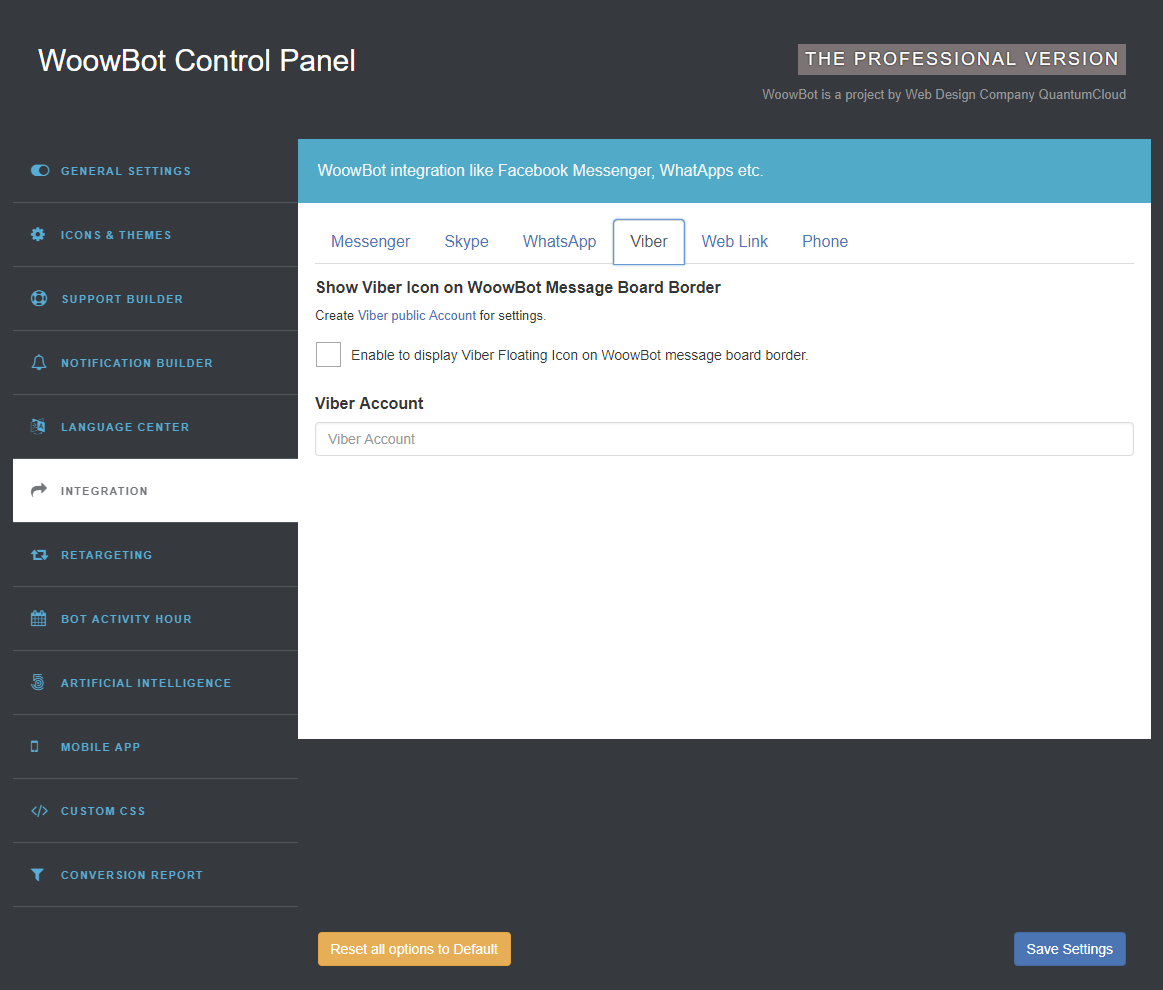
- Need Viber public account to enable on WoowBot. Create Viber public Account for settings
- Show Viber Icon on WoowBot Message Board Border
- Viber Account
6.5.Web Lin
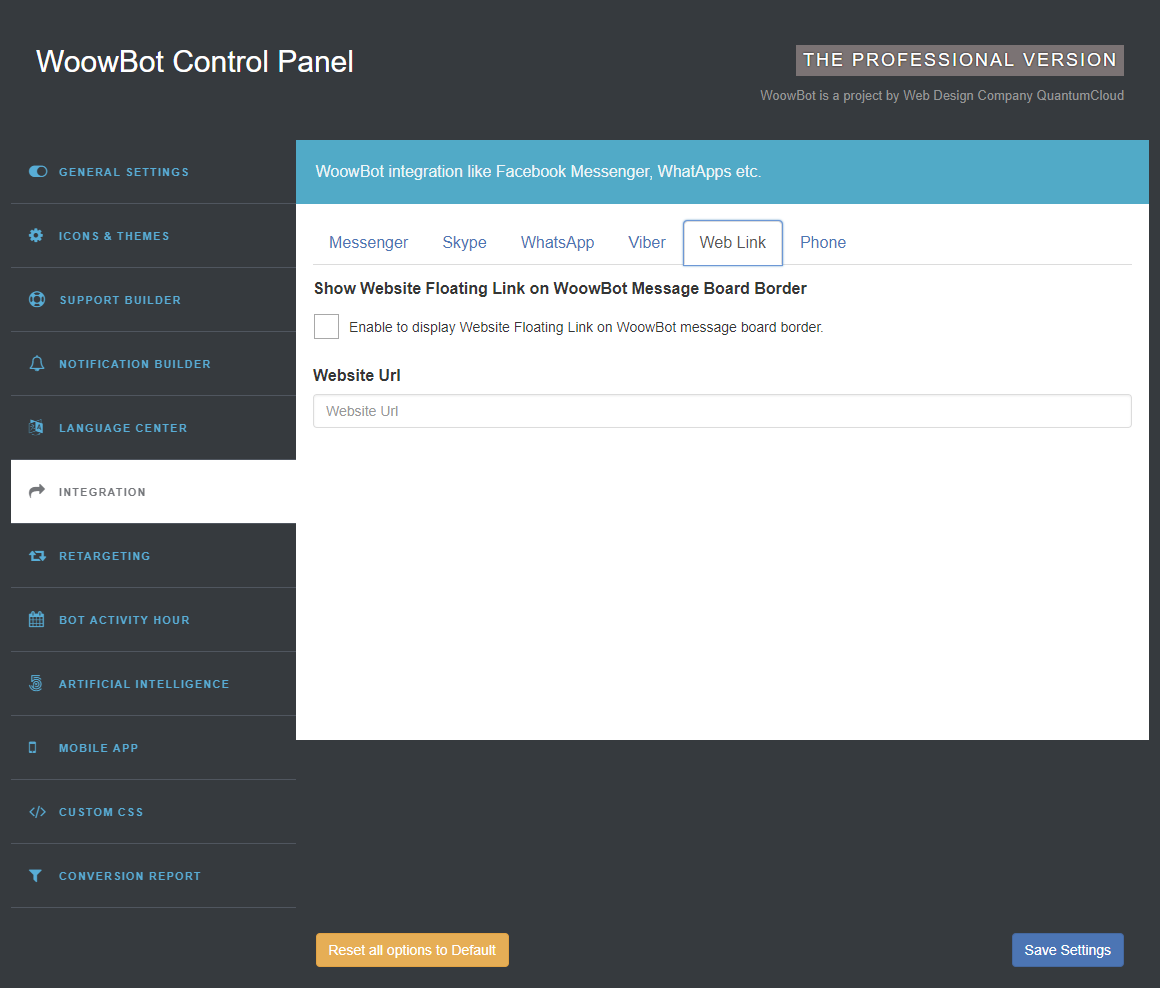
- Need Web Link to enable on WoowBot. Options are
- Show Website Floating Link on WoowBot Message Board Border
- Website Url
6.6.Phone

- Need Phone number to enable on WoowBot.options are
- Show Phone Icon on WoowBot Message Board Border
- Phone Number
7. RETARGETING
- Mobile App Pages To create pages for WoowBot Android & IOS Mobile App.
8. BOT ACTIVITY HOUR
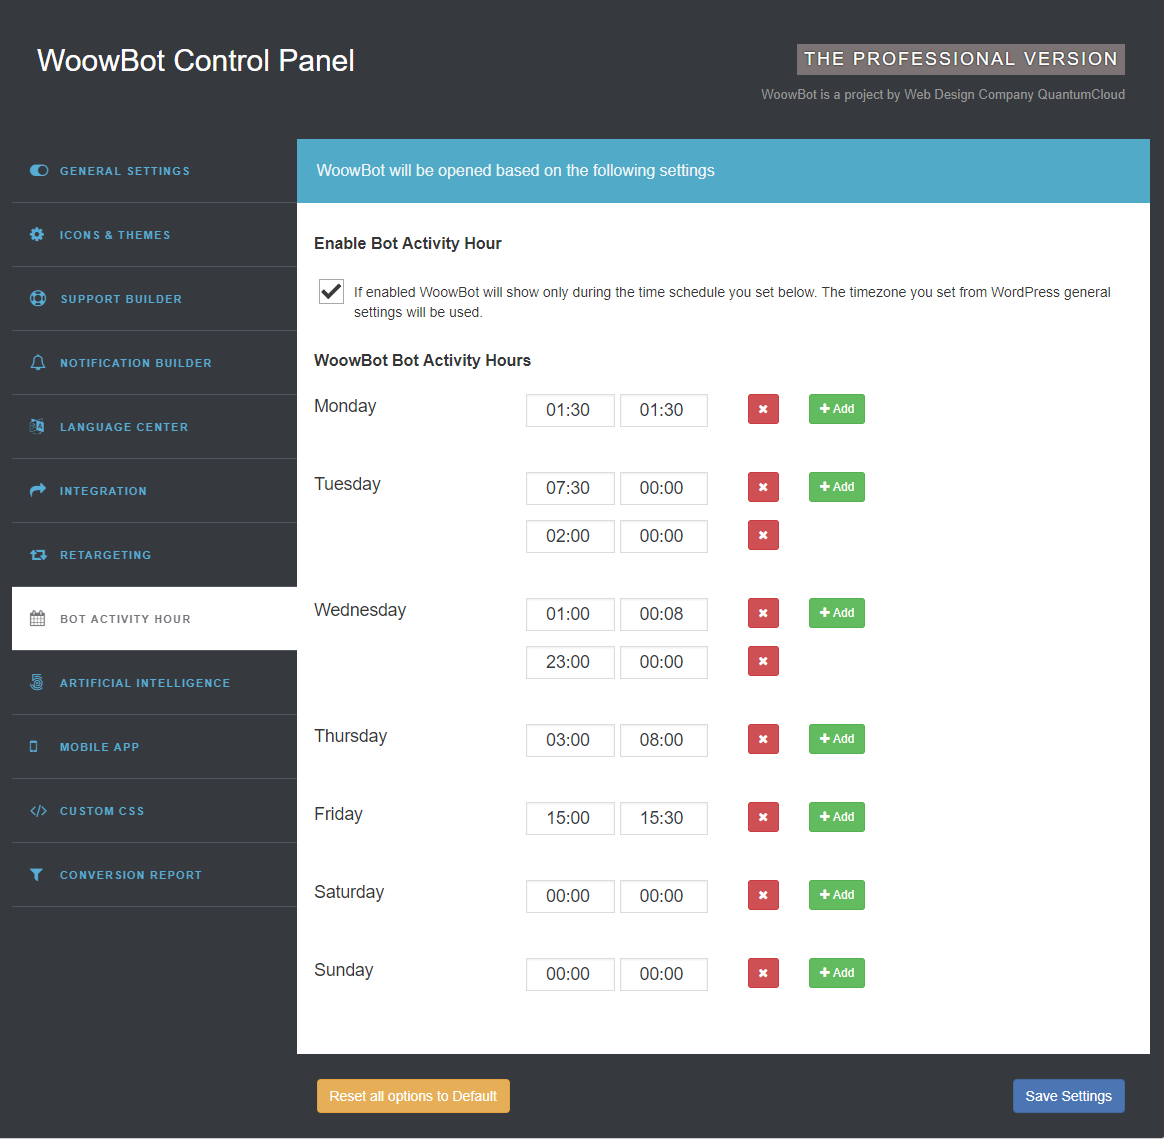
- Enable Bot Activity Hour - If enabled WoowBot will show only during the time schedule you set below. The timezone you set from WordPress general settings will be used.
9. AI and NLP
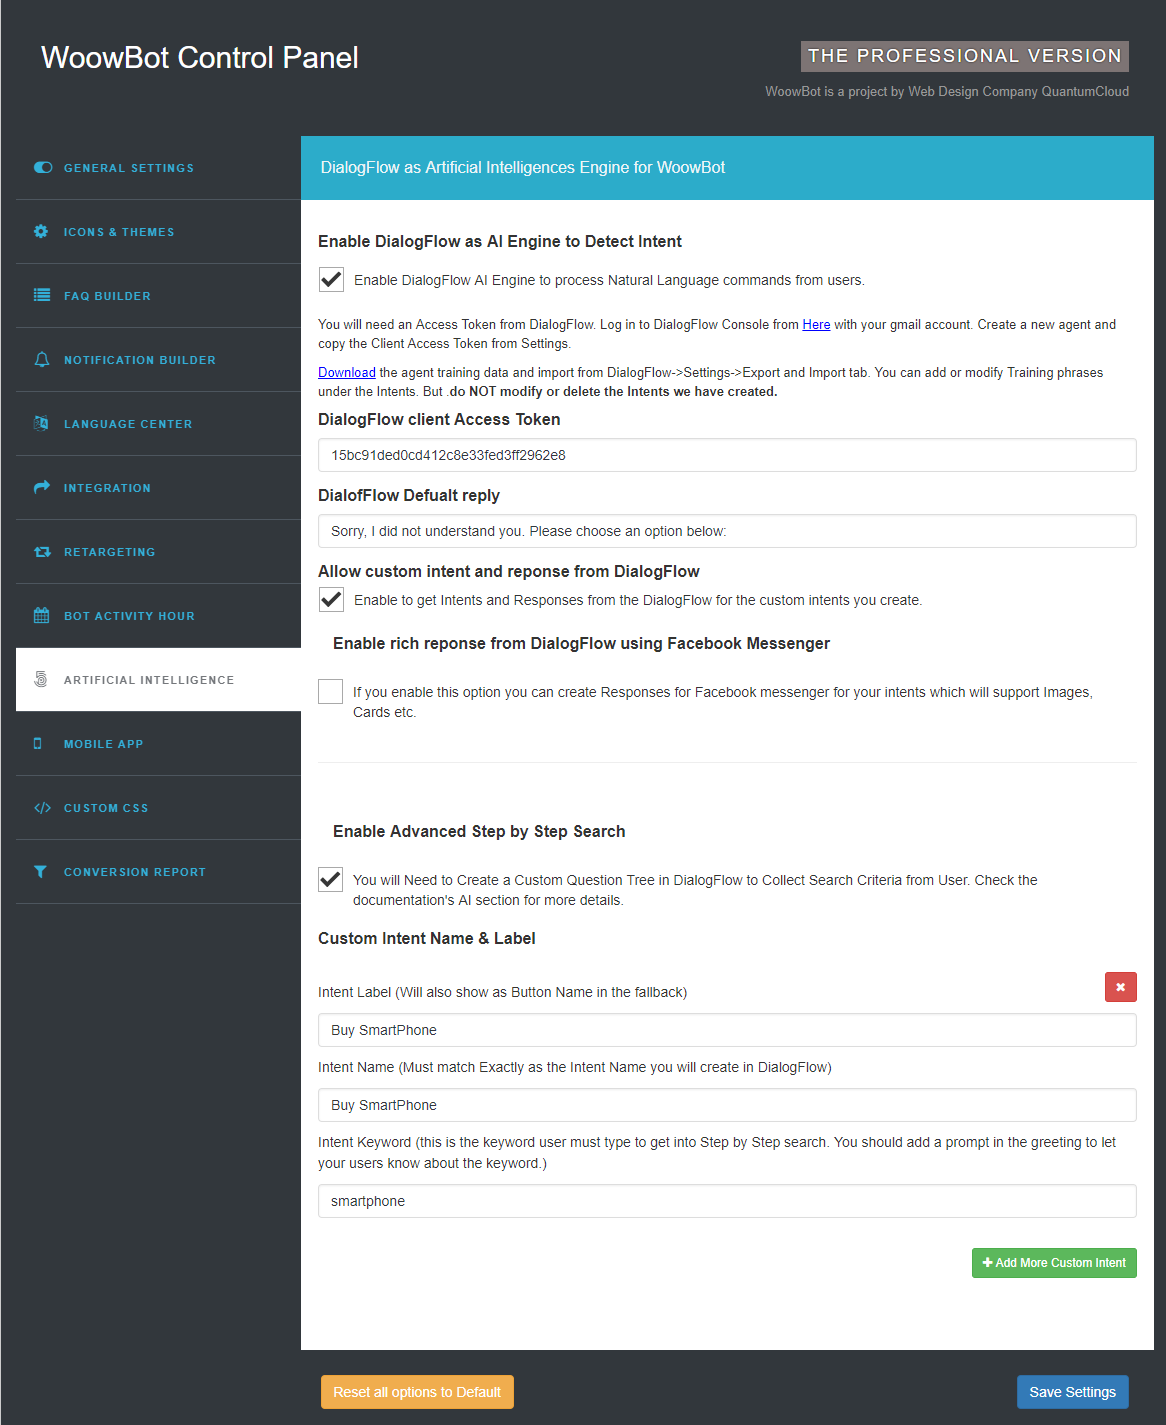
- Enable DialogFlow as AI Engine to Detect Intents and to process users inputs in Natural Language. A fail safe list of buttons will be shown when no intent is matched so the users do not get frustrated.
- DialogFlow client Access Token You will need an Access Token from DialogFlow. Log in to DialogFlow Console from Here with your gmail account. Create a new agent and copy the Client Access Token from Settings.
- Import Agent to DialogFlow Download the agent training data (From WoowBot Setting page) and import to DialogFlow->Settings->Export and Import tab. You can add or modify Training phrases under the Intents. But .do NOT modify or delete the ready made Intents we have created.
- DialofFlow Defualt reply when no intent is matched is "Sorry, I did not understand you. You may browse below. " Change it to anything else if you want. The bot will then fall back to Start up buttons and premade intents.
- Allow custom intents and reponses from DialogFlow Enable to get Intents and Responses from the DialogFlow for any custom intents you create. Use this feature if you have some basic understanidng of how Natural Language processing and dialog flow works. WoowBot will take the user's input and query dialogflow to try and match all the intents including the custom ones. If a custom intent match is found WoowBot will display the Response you created for that intent.
-
Enable rich response from DialogFlow using Facebook MessengerIf you enable
this option you can create Response messages for Facebook messenger for your intents which will
support Images, Cards etc. These rich responses will be shown inside the WoowBot when intent
matches. Quite useful to create cards and options.
- Enable Advanced Step by Step Search This feature lets you createa a series of questions that will be asked by the bot. Based on the user inputs, a custom product search query will be created to search all your WooCommerce products. You will Need to Create a Custom Question Tree in DialogFlow to Collect Search Criteria from the User.
- Custom Intent Name & Label Intent Label (Will also show as Button Name in the fallback) and Intent Name (Must match Exactly as the Intent Name you will create in the DialogFlow).
- Intent Keyword (this is the keyword user must type to get into Step by Step search. You should add a prompt in the greeting to let your users know about the keyword.). WoowBot will enter into the Step by Step search intent only when user types this keyword.
Check the DialogFlow Agent Intents and Entities guide and see the description below about how to get step by step search option to work:.
Creating Custom Intent, Entities, Action parameters and response for Step by Step Search
-
Create Intent and Training phrases you need to create an intent for step by
step search by clicking on Intents + (Plus) sign from the left panel. You will need to copy
this Intent Name exactly and paste in the WoowBot settings for step by step search.
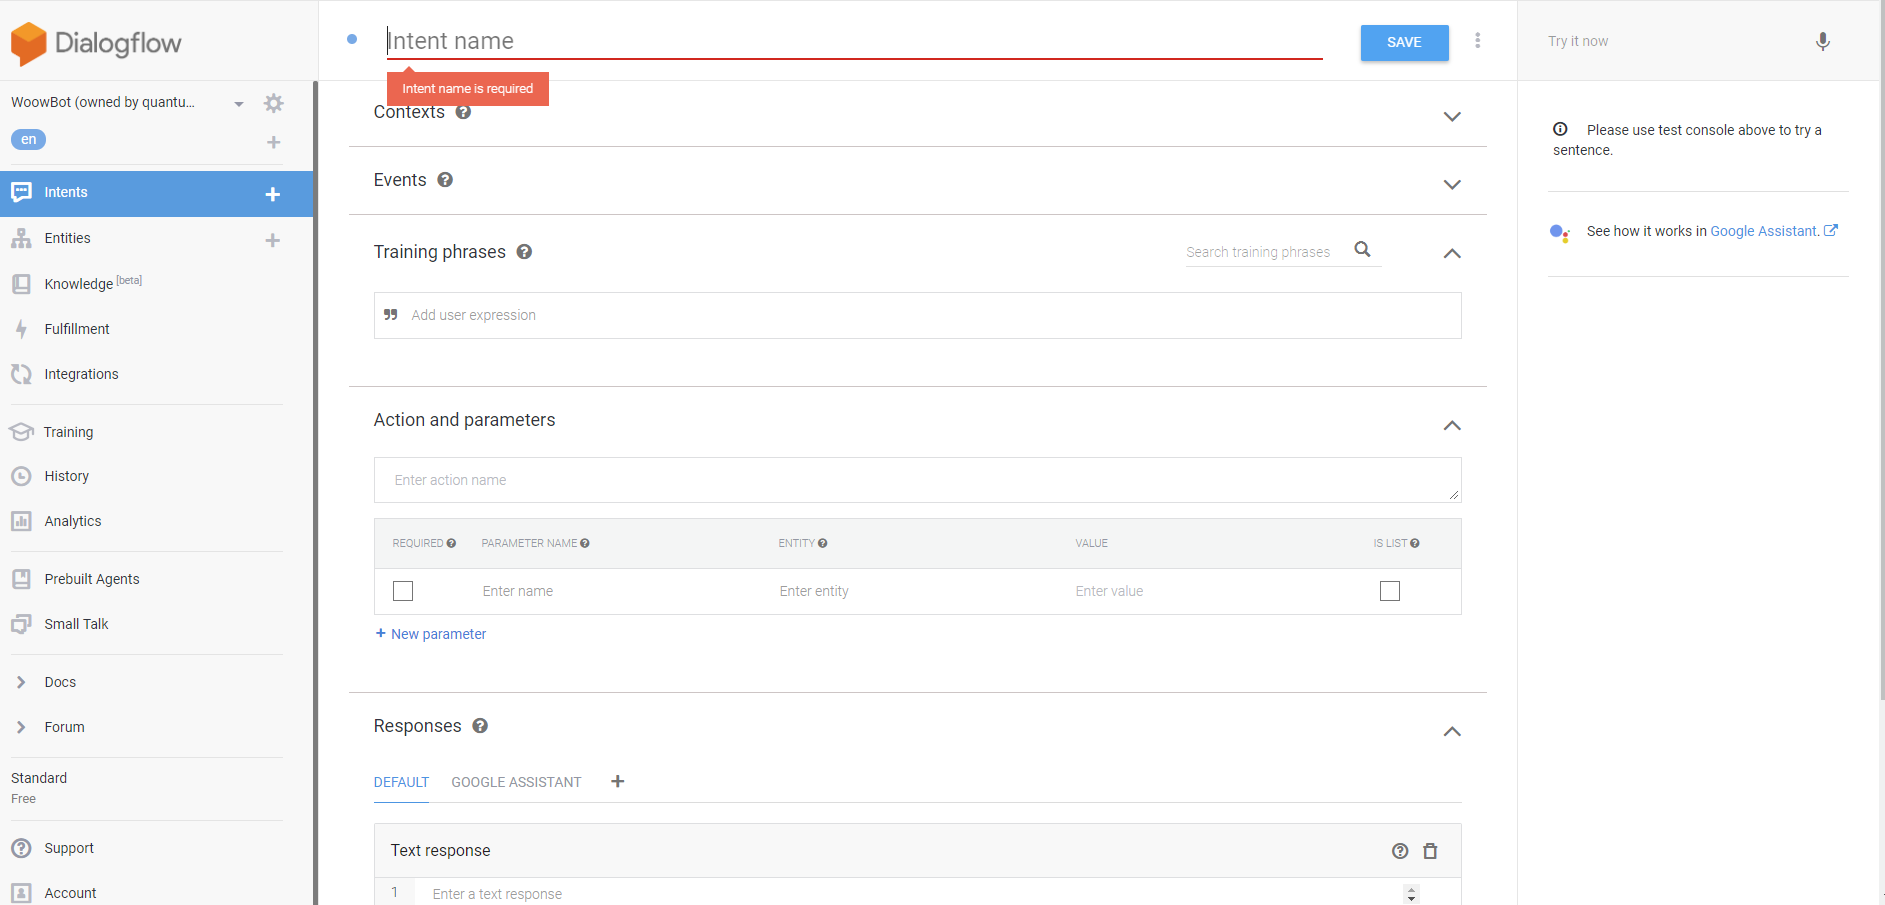
- Adding training phrases is not really necessary because Step by Step search is triggered by a special keyword that you will define in the WoowBot Backend.
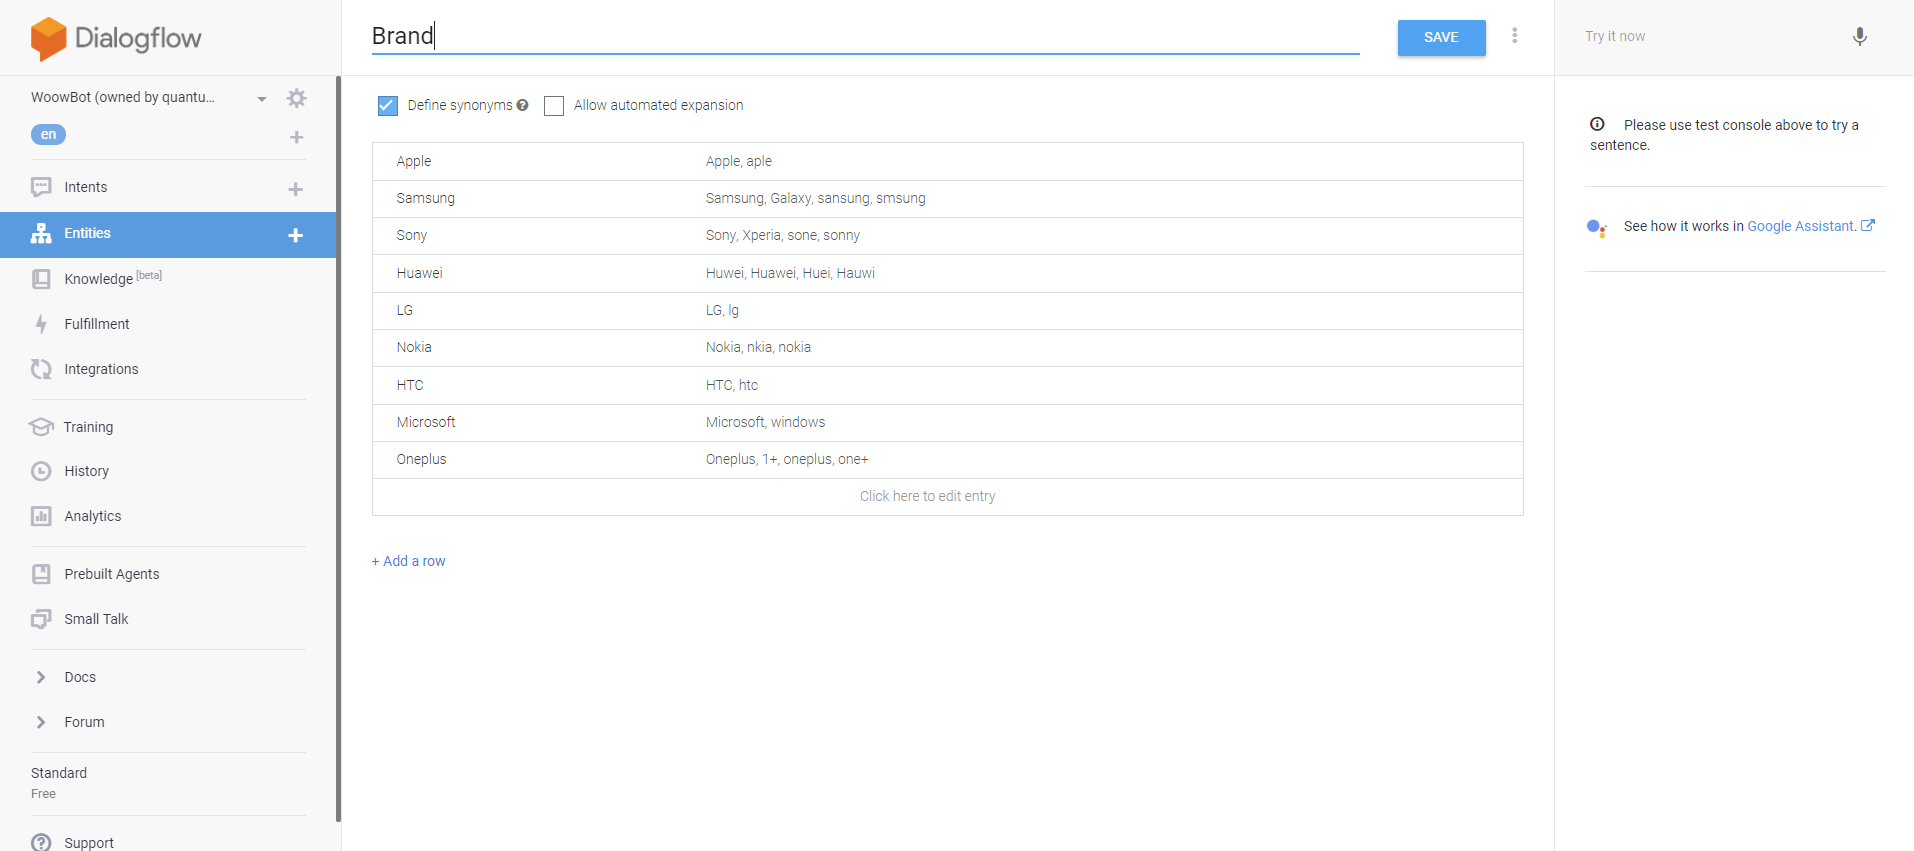
- Create Entities and Define synonym To create Entity click on Entities +
(Plus) sign from left side panel. You will need to create an entity for each of your questions.
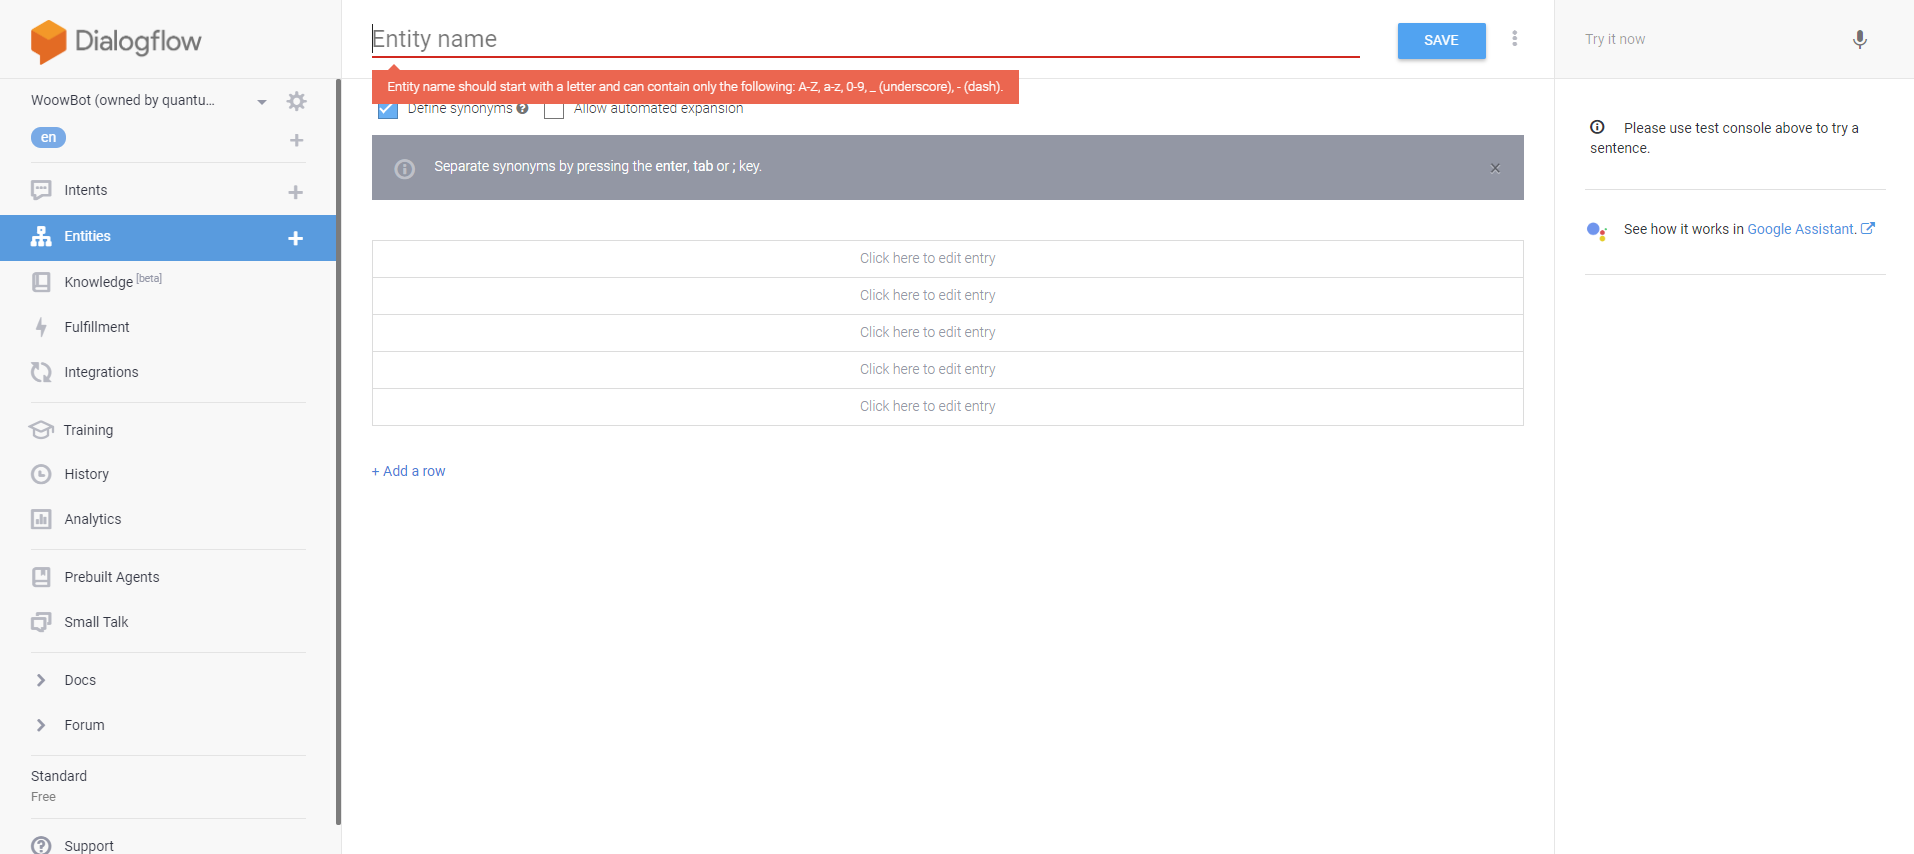
Define the Synonyms for each entity. These will form parts of the queries matched against the user's inputs
-
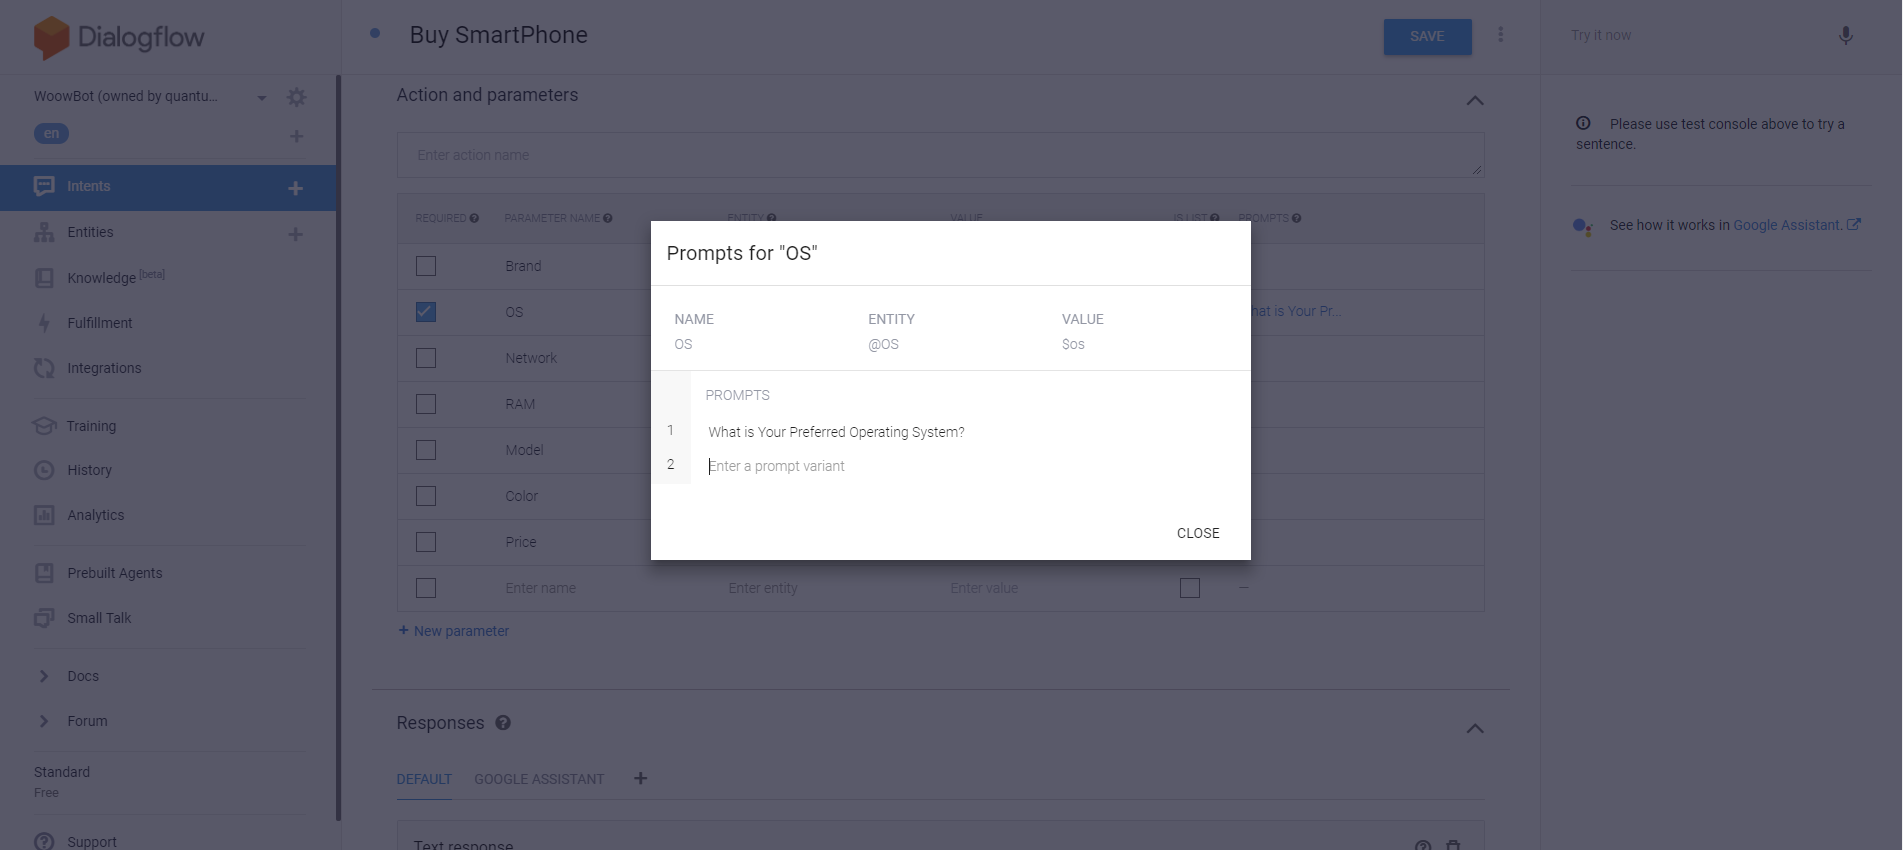
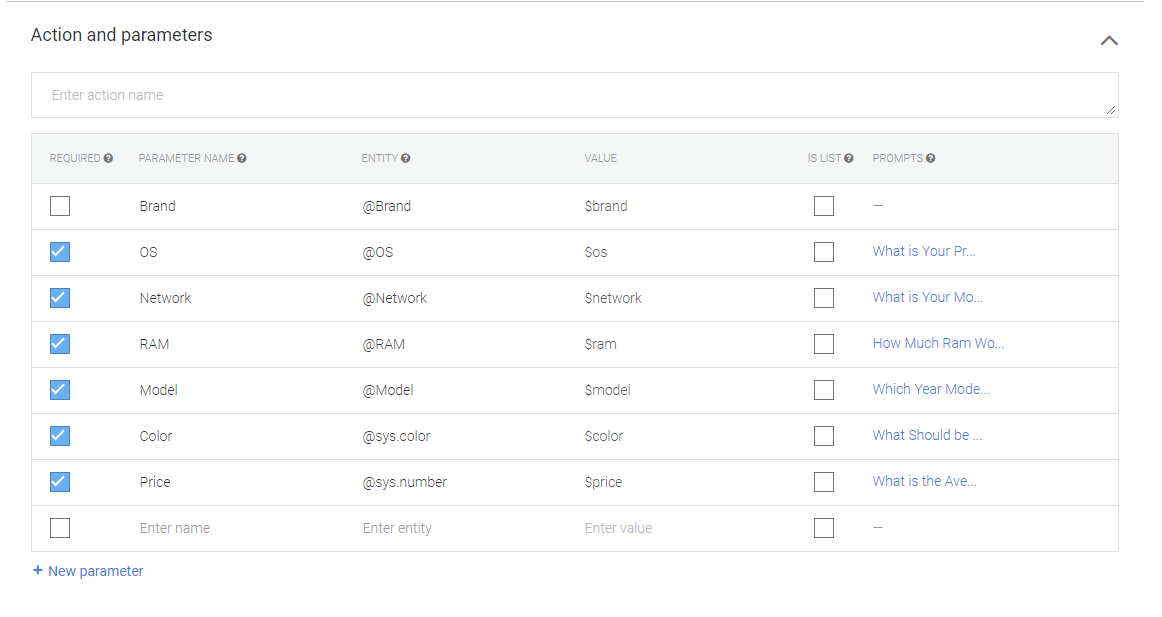
Action and parameters To get parameter reponse as value from user you will
need to make parameter as required and add the prompts which will ask the user a question and
form the question tree.
-
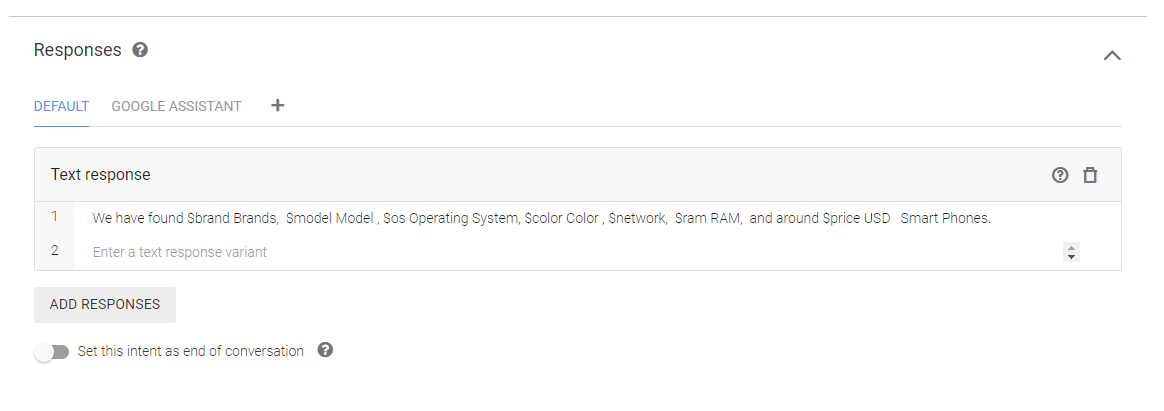
Create response for the intent With variable valuse of parameters using the
Entities you created. In the screenshot below $brand, $model etc. are all entities we create.
10. CUSTOM CSS
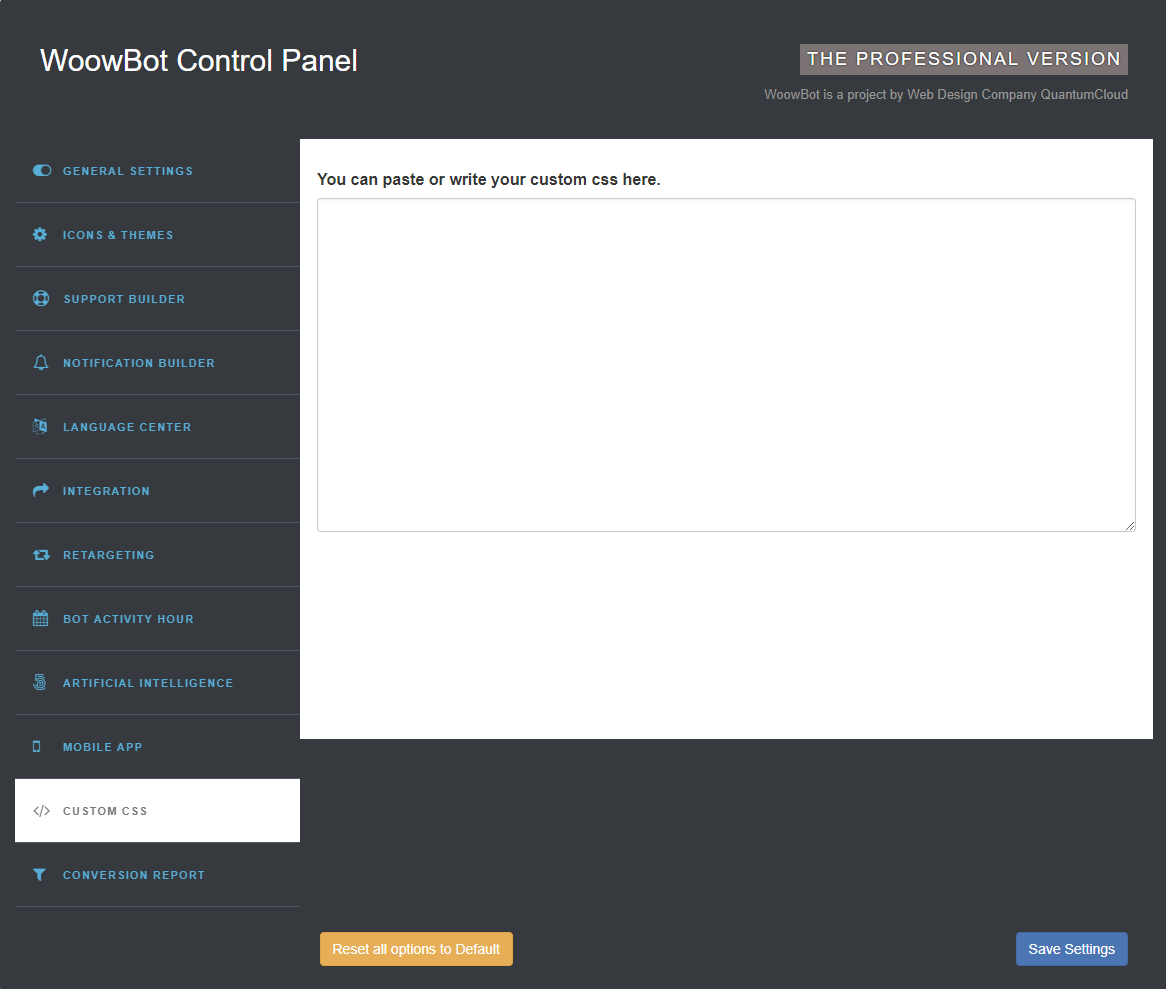
- In Custom CSS - Enter any custom valid CSS without any wrapping "style" tags.
11. CUSTOMER CONVERSION REPORT
11.1.General Report
11.2.Custom Report
- Pick dates for custom search To get result, you will need to fill up the From and To fileds using Date picker then click on the Go button.
Shortcode
HOW TO DISPLAY WoowBot SHORTCODE.
WoowBot comes with two types of ShortCodes that can be placed anywhere in your WordPress site.
ShortCodes are
- WoowBot Full page shortcode - [WoowBot-page]
- Template ShortCodes are -
- Template Basic - [WoowBot template=00]
- Template One - [WoowBot template=01]
- Template Two - [WoowBot template=02]
- Template Three - [WoowBot template=03]
Support
To get priority support, please open a support ticket with us.
Any feedback or feature requests are most welcome. We will try to incorporate your valuable suggestions with our item.
Developed by Professional Web Design and Development Company QuantumCloud
Partner with us if you need any design or development help with your website!
Sources and Credits
We have shamelessly borrowed code and ideas from the following great open source projects (Thanks!):