Simple Link Directory - Pro
Introduction
- Item Name : Simple Link Directory
- Author : QuantumCloud
First of all, Thank you so much for purchasing this plugin and for being our loyal customer. You are awesome!
To get priority support, please open a support ticket with us.
Any feedback or feature requests are most welcome. We will try to incorporate your valuable suggestions with our item.
ABOUT
Simple Link Directory Pro is a unique and advanced solution to createsharable one page Link Directory, resource page or partners page. This is a new way to create useful Link Directories easily and quickly that people will love to share and bookmark.
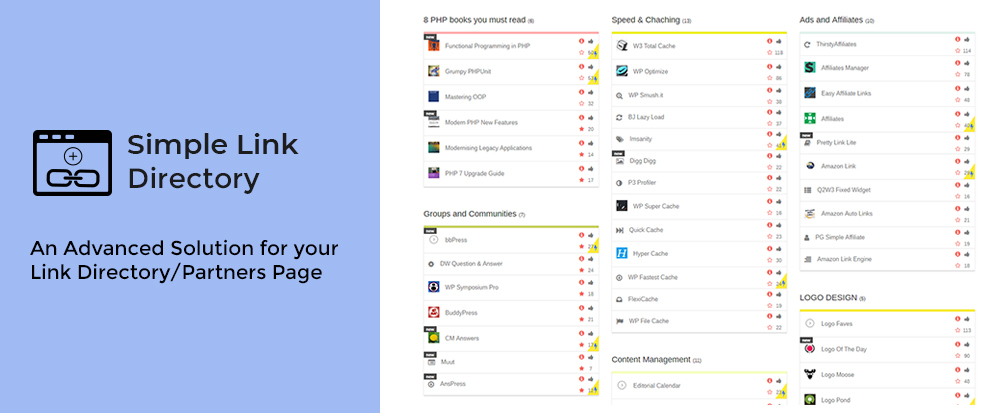
Forget those boring directory styles and layouts. This innovative and powerful, yet Simple Link Directory WordPress PlugIn allows you to create comprehensive Lists of websites with their logo and a short description with ease. Create dozens or hundreds of lists of relevant website links on any broad topic. Then show all your Link Lists in beautiful layout on a single page. Or you can choose any single link List to show with short code.
Simple Link Directory Pro Features
- Build lists with dozens or hundreds of links and show them in one page
- Use as Link Directory or Partners and Associates pages
- Configurable List highlight color for each list
- Customize colors of all aspects of the link lists
- User Up Vote
- Complete control over list ordering
- Live, on page, instant search
- Live, on page, instant filtering of lists
- Admin settings to turn on/off live search, filtering
- Powerful short code options for extensive control over display
- Add to List button (link to a contact form or google doc)
- RTL support
- Widget for Latest, Most Voted and Random list items
- Order Items by up-votes & item title
- Custom CSS to add your own style
- URL masking option for affiliate links
- Allow others to Embed your Lists on their websites!
- Frontend Submission
- Integrated PayPal Payment to add list and so much more...
Installation and Overview of Features
You can install "Simple Link Directory - Premium" plugin by following some simple and easy steps.
Please find 'qc-simple-link-directory.zip' file inside your downloaded package and install it following the steps below: -
From your WordPress dashboard:
- Visit 'Plugins > Add New'
- Click on 'Upload'
- Click on 'Browse' button and then select 'qc-simple-link-directory.zip' from file upload window
- Then click 'Install Now' button. The plugin will be installed within some moments.
- Then click 'Activate Plugin' link to activate the installed 'Simple Link Directory - Premium' plugin.
Manual Installation:
- 'Upload / Copy' 'qc-simple-link-directory.zip' file to your 'wp-content\plugins' folder
- Unzip the 'qc-simple-link-directory.zip' file
- Visit 'Plugins -> Installed Plugins' from your site dashboard
- Find 'Simple Link Directory - Premium' in the plugins list, and activate it by clicking on 'Activate' link
Important: Only follow the upgrade section if you want to upgrade your plugin from free version to premium version. Otherwise please ignore this UPGRADE section below.
HOW TO UPGRADE FROM FREE VERSION
To upgrade your "Simple Link Directory" plugin from FREE version to PREMIUM version please follow the below steps:
- Download the latest pro version of the plugin from website
- Log in to your WordPress admin area and go to the Plugins management page.
- Deactivate and Delete the old version of the plugin (don’t worry – your data is safe)
- Upload and Activate the latest pro version of the plugin
- You are done.
Getting Started
After installing 'Simple Link Directory - Premium' plugin, you can manage your like directory and items as below -
Simple Steps to get Started:
- After Installing the plguin, crate your new list from 'Simple Link Directory' --> 'New List'
- Go to your post/page where you want to display list directory and then insert sortcode (by manually or by clicking on Add SLD Shortcode button of your WP text editor).
- Save your page and check the output
- For more details please see below sections
Check These Video Tutorials We Created To Give You A Jump Start!
Getting Started with Simple Link Directory Pro
Setting Up Front End Link Submission
Setting Up Multi Page Directory
1. Create a New List
- Go to 'Dashboard' --> 'Simple Link Directory' --> 'New List'
- Give your list a title
- You can configure list appearence colors (optional, if not set then defaults will be used) from List Configurations section
- From List Elements section, click on Add New button to add list items
- Give your list item a title, link, subtitle and set other fields/parameters as you like.
- Add as much items as required by clicking on Add New button repeatedly.
- When you are done, then click on Publish button to save and publish your list.
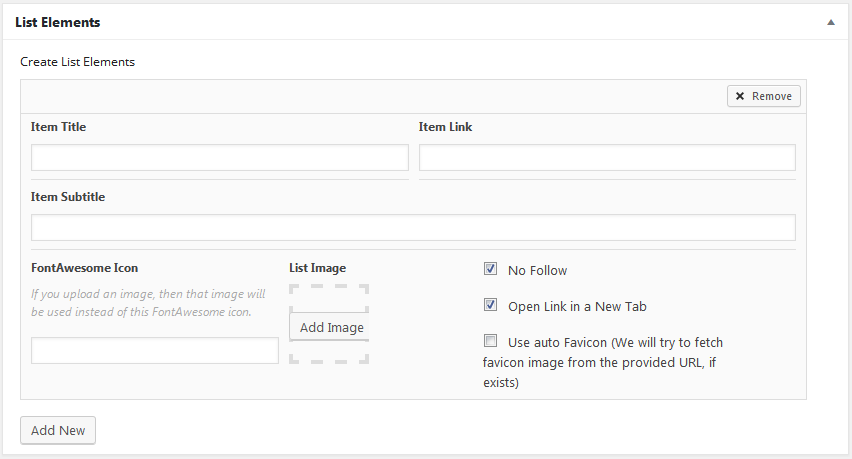
Priority for list item image is as: Uploaded Image > FontAwesome Icon > Favicon Image > Default Image
2. Update an Existing List
- Go to 'Dashboard' --> 'Simple Link Directory' --> "Manage List Items"
- Choose a list you want to modify and then click on EDIT (hover on list title to get the EDIT button)
- In EDIT screen, change/tune list contents and configurations as you like
- Finally click on "Update" button to execute your changes.
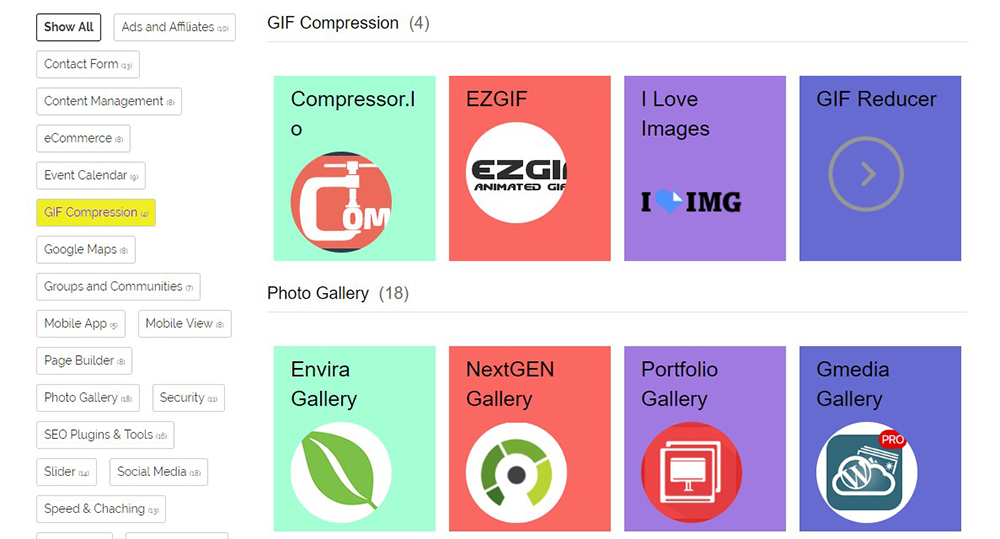
3. Create List Category
- Go to 'Dashboard' --> 'Simple Link Directory' --> "List Categories"
- Give your new list category a Name, also you can optionally provide Slug.
- Click on "Add New List Category" button
You can also EDIT you list categories from the same screen.
When you will be editing your list item or creating a new one - you will get the category items to pick from the right column.
4. Reordering List Items (Manual order of appearence)
Note: If you want to display your list items in the from end as per your manual ordering, then you must need to set two shortcode parameters, these are
orderby="menu_order" and order="ASC"
- Go to 'Dashboard' --> 'Simple Link Directory' --> "List Ordering"
- Drag and Drop list item by placing your mouse over Order/Move icon
- After dropping list items up/down, they will be saved automatically in that order.
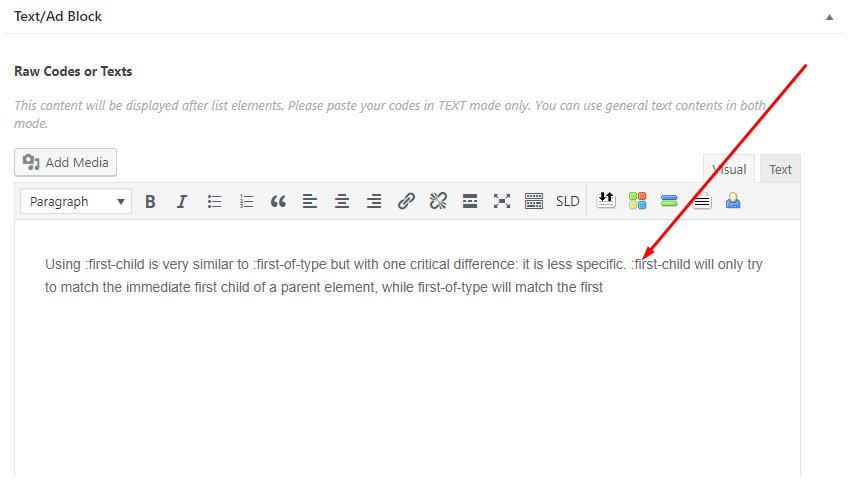
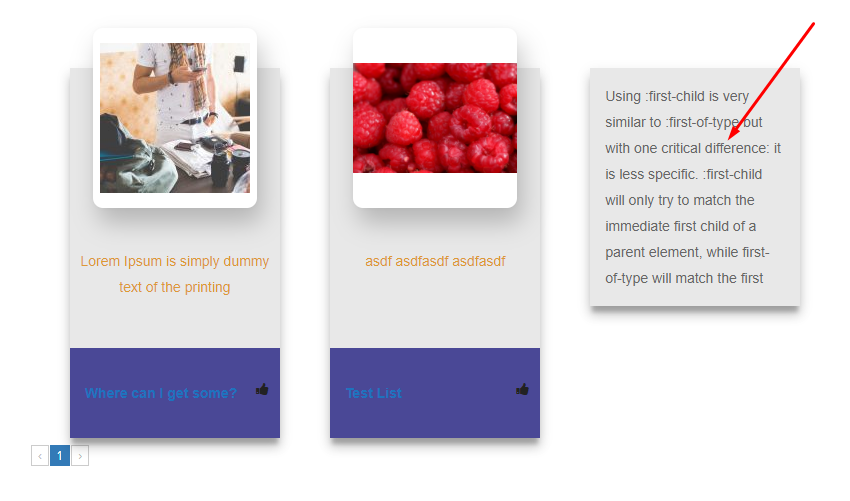
5. Ad/Text Area
Whenever you go to 'Dashboard' --> 'Simple Link Directory' --> "New List"
page you will see a area called Text/Ad Block
You can put some content here & it will display at the very button of the list page. The screenshort below
shows some examples..
Note: For details about settings and adjustments please visit our Settings section.
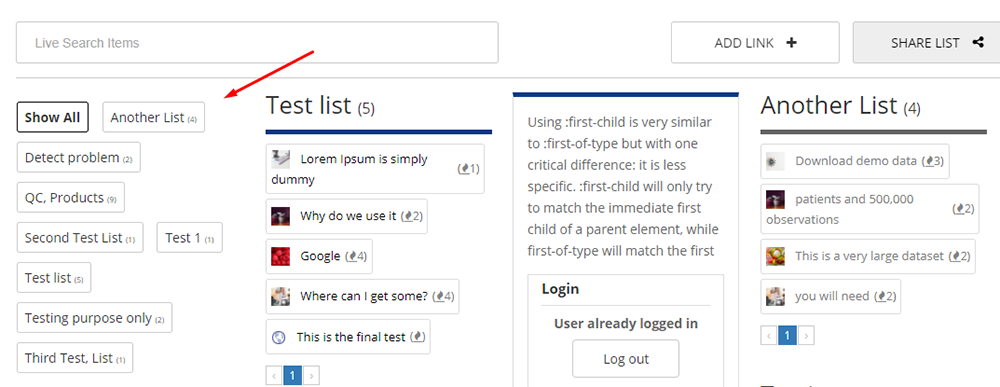
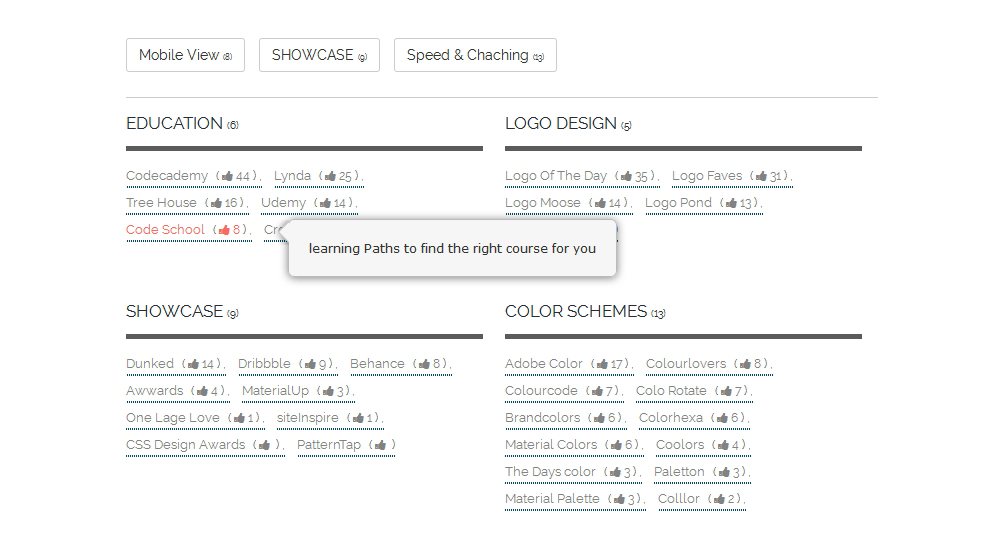
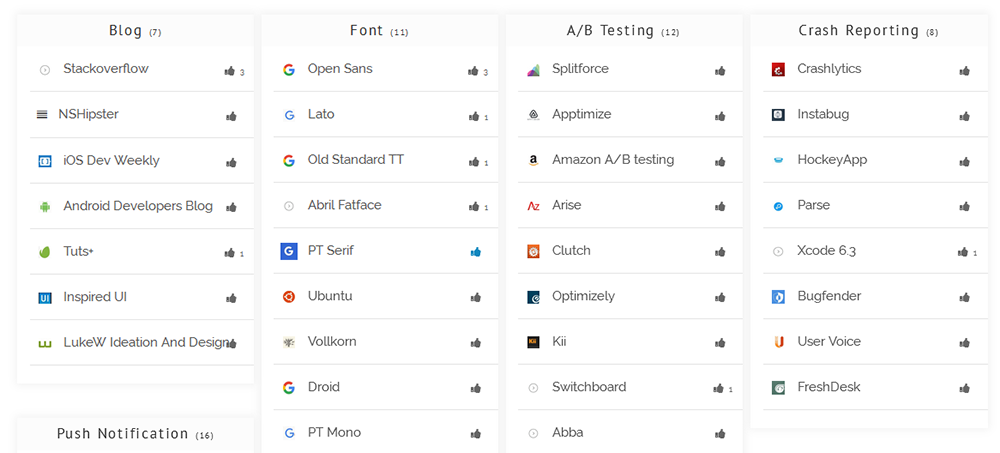
How to Display List
To display the lists in your post/page, you need to use shortcode.
You can use shortcode button [in your TinyMCE] editor to pick the shortcode with default parameters. Or, you can use/copy shortcode example from below.
View of Shortcode Generator is as below:

Category Tab
By useing shortcode generator you can generate a shortcode for category tab where all your list will appear as category tab in a page. In order to do this you have to select mode as Category Tab.

Also you can order category and if you want to remove any category from category tab you have to add a extra
parameter category_remove and pass the category id as comma(,) seperated.
Example :
category_remove="50,51,52"
Shortcode Example
For all the lists:
[qcopd-directory mode="all" style="simple" column="2" search="true" category="" upvote="on" item_count="on" orderby="date" order="DESC"]
For only a single list:
[qcopd-directory mode="one" list_id="75"]
For all Lists in tabbed category view:
[sld-tab mode="categorytab" style="simple"]
For Lists only in a certain category :
[qcopd-directory
category="your-category-name"]
Available Parameters:
1. mode
Value for this option can be set as "one" or "all".
2. column
Avaialble values: "1", "2", "3" or "4".
3. style
Avaialble values: "simple", "style-1", "style-2", "style-3",
"style-4", "style-5", "style-6", "style-7", "style-8",
"style-9", "style-10", "style-11" , "style-12", "style-13",
"style-14".
Default is: simple, Example: style="style-2"
4. orderby
Compatible order by values: 'ID', 'author', 'title', 'name',
'type',
'date', 'modified', 'rand' and 'menu_order'.
Default is: menu_order
5. order
Value for this option can be set as "ASC" for Ascending or "DESC" for Descending order.
Default is: ASC
6. list_id
Only applicable if you want to display a single list [not all]. You can provide specific list id here as a
value.
You can also get ready shortcode for a single list under "Manage List Items" menu.
7. category
Supply the category slug of your specific directory category.
Example: category="designs"
8. search
Values: true or false. If you want to display on-page search for items, then you can set this parameter to
'true'. Example: search="true"
9. upvote
Values: on or off. This options allows upvoting of your list items.
Example: upvote="on"
10. item_count
Values: on or off. This options allows to display list items count just beside your list heading.
Example: item_count="on"
11. top_area
Values: on or off. You can hide top area (search and link submit) from any individual templates if you
require.
This option is handy if you want to display multiple template in the same page.
Example: top_area="off"
12. item_orderby
Values: 'upvotes', 'title', 'timestamp', 'random'. You can order/sort list items by upvote counts or by
their
titles, or even by their entry time (descending order). It also support item randomize display option.
Example: item_orderby="upvotes"
13. mask_url
Values: 'on', 'off'. This option will allow you to hide promotional/affliate links from the visitors.
Visitors will
not be able to see these type of links when they mouseover on the links, but upon clicking on these links -
they
will be redirected to the original/set affliate links.
Example: mask_url="on"
Please note that URL masking may hurt your SEO.
14. paginate_items
Values: "true", "false". This option will allow you to paginate list items. It will break the list page
wise.
Example: paginate_items="true"
[Only applicable for certain templates.]
15. per_page
This option indicates the number of items per page. Default is "5". paginate_items="true" is required to
find
this
parameter in action.
Example: per_page="5"
[Only applicable for certain templates.]
16. tooltip
You can enable or disable tooltip by using this parameter. Accepted values are "true" and "false".
Example: tooltip="true"
[Only applicable for certain templates.]
17. Filter Area
You can set the filter area fixed position using this below parameter.
Example: filter_area="fixed"
[vailable values: fixed, normal.]
18. Filter Area Top Spacing
You can set Top Spacing for filter area using this below parameter.
Example: topspacing="50"
[Available values: It could be any integer.]
19. Remove category from category tab
You can remove specific category from Category Tab using this below parameter.
Example: category_remove="50,51,52"
You can add multiple Category ID as coma(,) seperated value.
Frontend Submission
Frontend Submission feature will allow your users to submit there list items by registering & logon to dashboard. Now you can populate your lists with users submitted items.
For doing this you have to create 4 pages and add some shortcode on each of those pages.
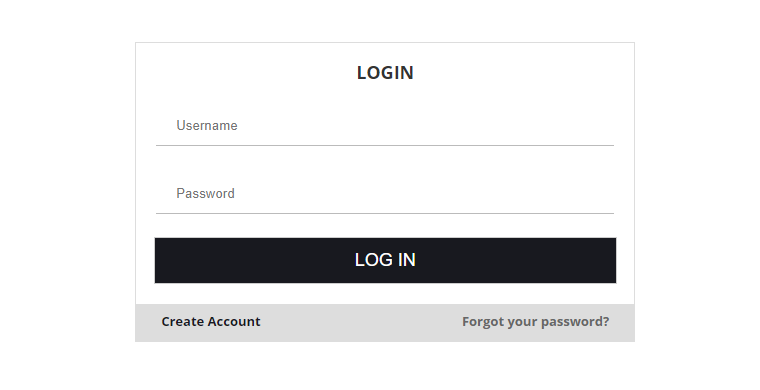
Login Page
Shortcode: [sld_login]
Login From will appear by adding this shortcode on a page. It should look like the below image.
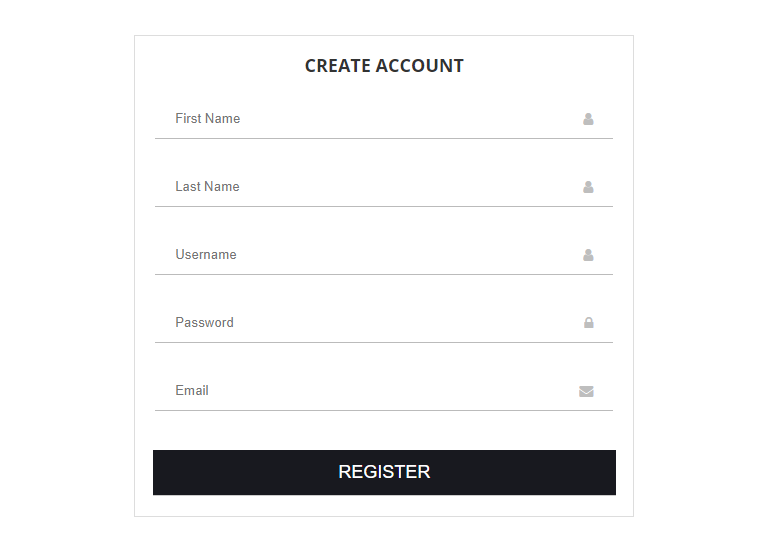
Registration Page
Shortcode: [sld_registration]
Registration From will appear by adding this shortcode on a page. It should look like the below image.
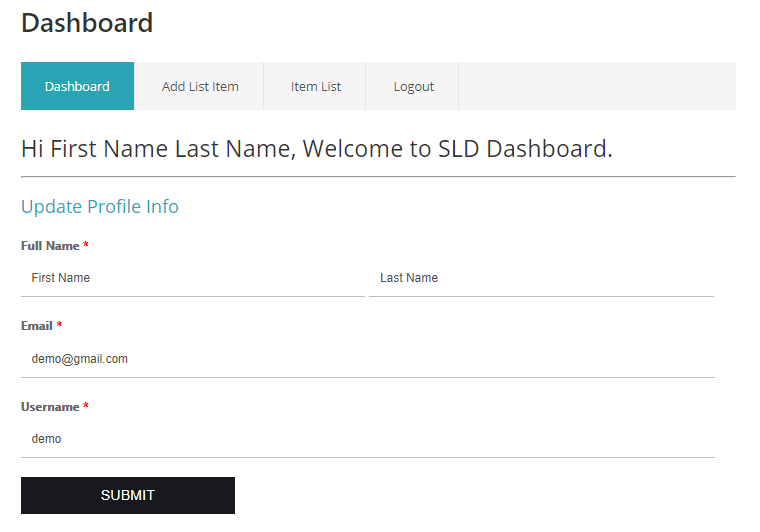
Dashboard Page
Shortcode: [sld_dashboard]
Dashboard (where people can manage there list items) will appear by adding this shortcode. Its required
logged in
to access this page. It should look like the below image.
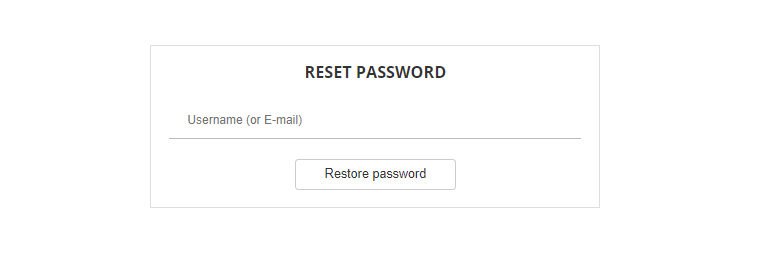
Reset Password Page
Shortcode: [sld_restore]
User will get password reset option by adding this shortcode on a page. It should look like the below image.
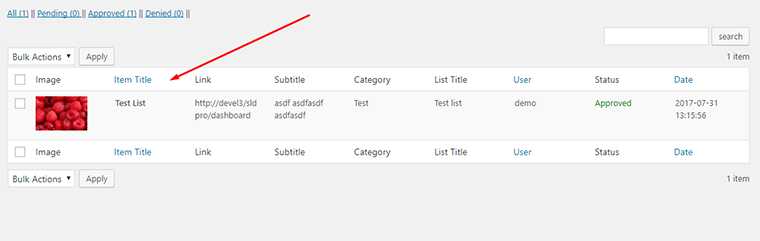
Manage User Items
A new page is added on admin side Simple Link Directory >> Manage User Items where admin can manage there
users
item.
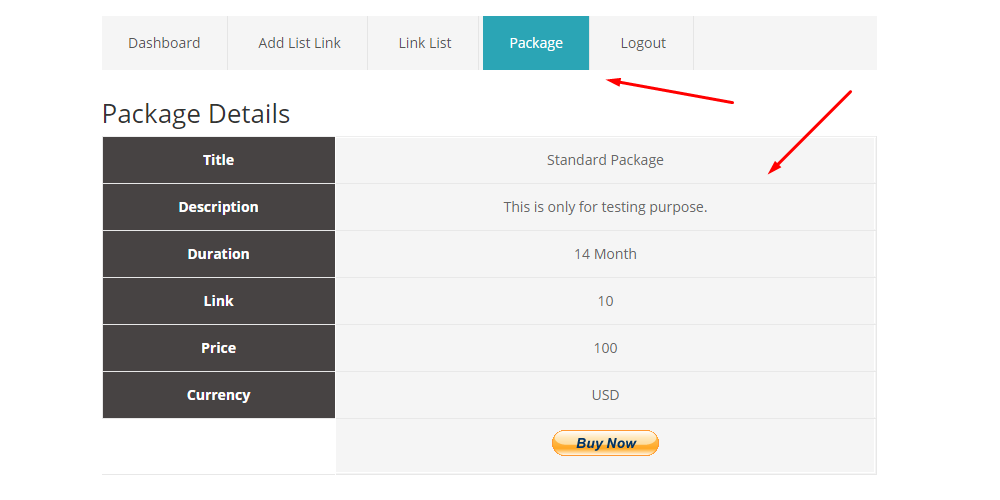
Package
By creating and enabling a package admin can allow user to submit there item after purchasing the package. For creating a package navigate fron admin Simple Link Directory > Package. Its a pretty simple form to create a package within a minute. The package only comes with paypal payment gateway.
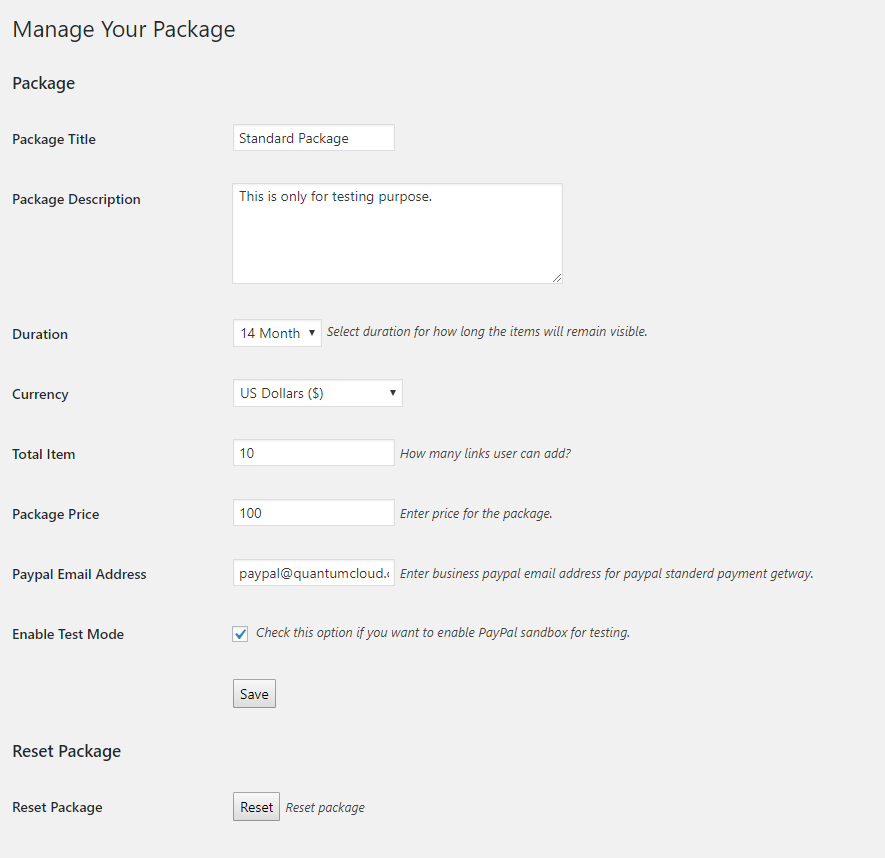
Admin test payment gateway by clicking Enable Test Mode. This package will apprear in the user dashboard by enabling package for frontend submission.
Order List
By navigating to Simple Link Directory > Order List admin can see the Order list for
package.

Settings
You can access settings page from - "Dashboard' --> 'Simple Link Directory' --> "Settings"
Settings options are self expanatory as their titles. Available settings options are as below:
1. SLD Admin Email
You have to put a email address for getting notification about new link submission from frontend & sld user registration.
2. Select Font Setting
You can change the font globaly by selecting a font from here.
3. Enable Top Area
If you set this option to ON, then SEARCH and FILTER bar will be displayed - othewise not.
4. Enable Live Search
This option will allow you to ON/OFF live SEARCH feature.
5. Filter Button Presentation Style
Display list filter button as normal button or carousel.
6. Enable Item Filtering Top
This option will allow you to enable/disable item filtering at top by the list titles.
7. Enable Item Filtering Left
This option will allow you to enable/disable item filtering at left by the list titles.
8. Enable RTL Direction
If you turn this option ON, then items and their titles will be alligned from Right to Left (RTL) direction.
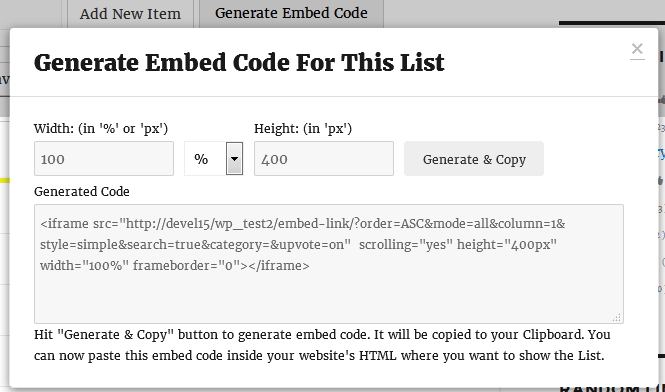
9. Enable Embed List Button
If you turn this option ON, then a new button "GENERATE EMBED CODE" will be added at the top of your list. Site visitors can then click this button to generate and copy embed code to use in other sites.
Generated iFrame code can be inserted in any other website or HTML page to display the same list with same functions. Embedded list contents will be served from your website.
Note: If you generate embed code from a site that has HTTP protocol, may not work properly if you paste and
use
that code in other site that runs on HTTPS protocol, and vice versa.
Frontend Submission
1. Enable Front End Submission
By enabling this other frontend submission related setting will appear.
2. Enable Free Frontend Submission
By enabling this user can able to submit there link free.
3. Free Submission Limit
You can specify the limit for free frontend submission. This field only take integer value.
4. Enable Package for Frontend Submission
You can enable your package by enabling this option.
5. Enable Email Notification for New Item Submission
Turn on to get new item submission notification.
6. Registration Captcha
Captcha will apprear in registration by enabling this option.
7. Allow User to Update Profile
By enabling this option user will able to update there profile from dashboard.
8. Allow User to Upload Image
By enabling this option user will able to upload there item image.
9. Disable No Follow
By enabling this option No follow will be disabled.
10. Auto Approve Registered Users
By enabling this option user will automatically approve to submit there item.
11. Auto Approve Item Submission
By enabling this option user item will published immediately without any approval.
Custom CSS
You can write your own CSS style here to add/override existing templates stylesheets.
Custom JS
You can write your own Javascript code here to add/override existing functionality.
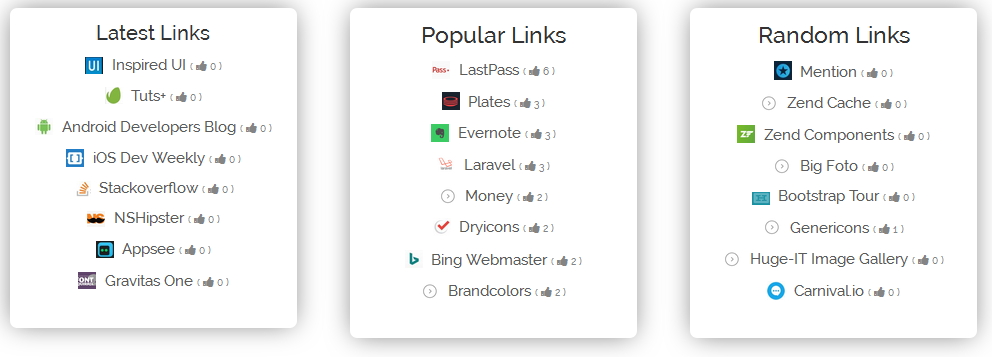
Widgets
You can use 3 shipped widgets to display Most Popular, Latest and Random Links.
To use these widgets, please visit: "Appearence --> Widgets" from your admin dashboard.
Then pick appropriate widgets from 1. SLD - Latest Links 2. SLD - Random List 3. SLD - Most Popular List,
next drag
and drop that widget in your any available widget area.
Sample view of widgets is as follows:
Import
You can use SLDs bulk import feature to add many contents from a single CSV page. To import content, use IMPORT menu under Simple Link Directory.
Please Note: The import feature is still under development. Right now it only allows importing and creating new Lists. Existing Lists will not get updated.
PROCESS:
- First download the above CSV file.
- Add/Edit rows on the top of it, by maintaing proper provided format/fields.
- Finally, upload file in the below form.
NOTES:
- It should be a simple CSV file.
- File encoding should be in UTF-8
- File must be prepared as per provided sample CSV file.
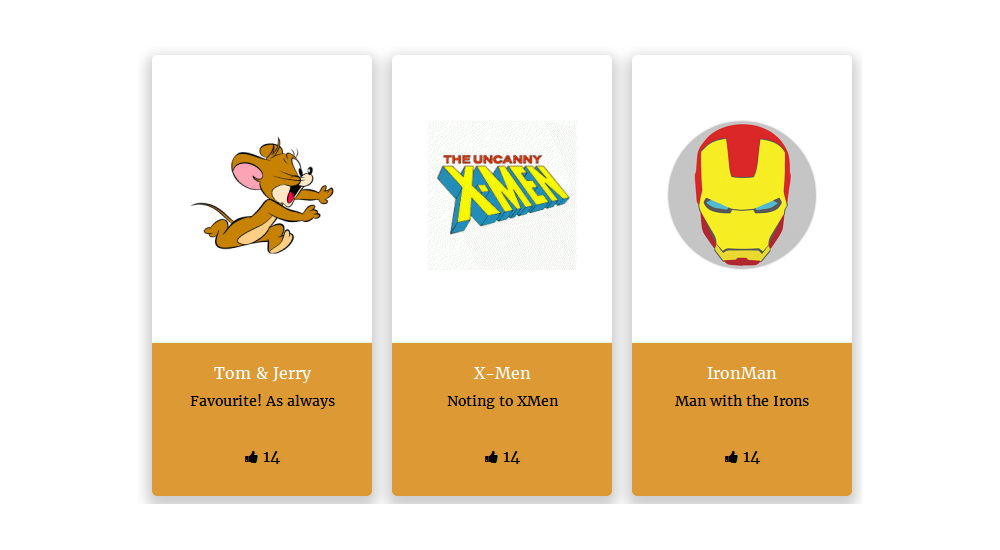
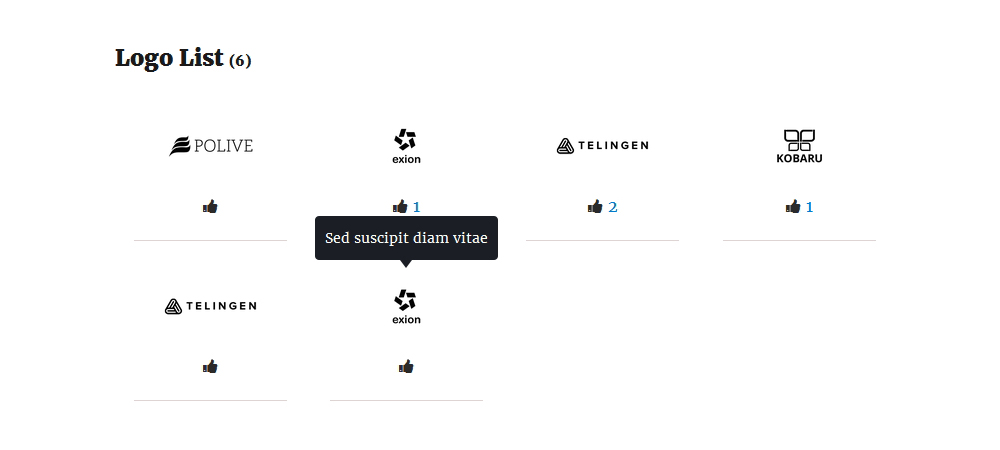
Template Styles
12 fully responsive and innovative templates. Couple of examples:
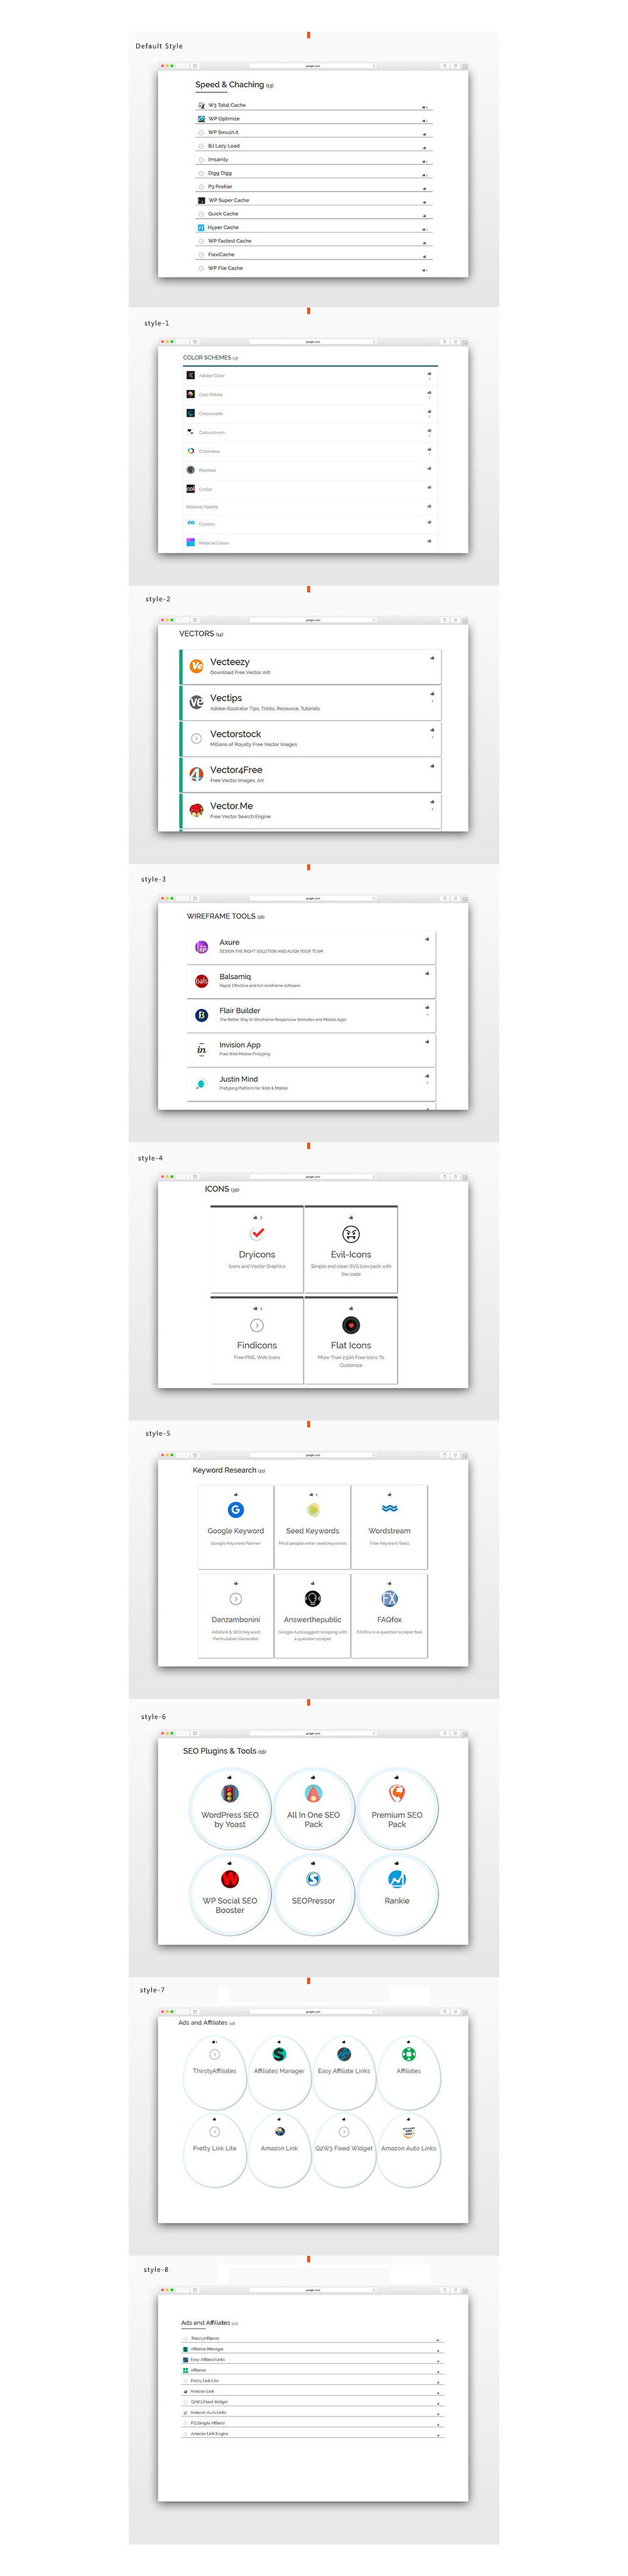
style-9
style-10
style-11
style-12
style-13
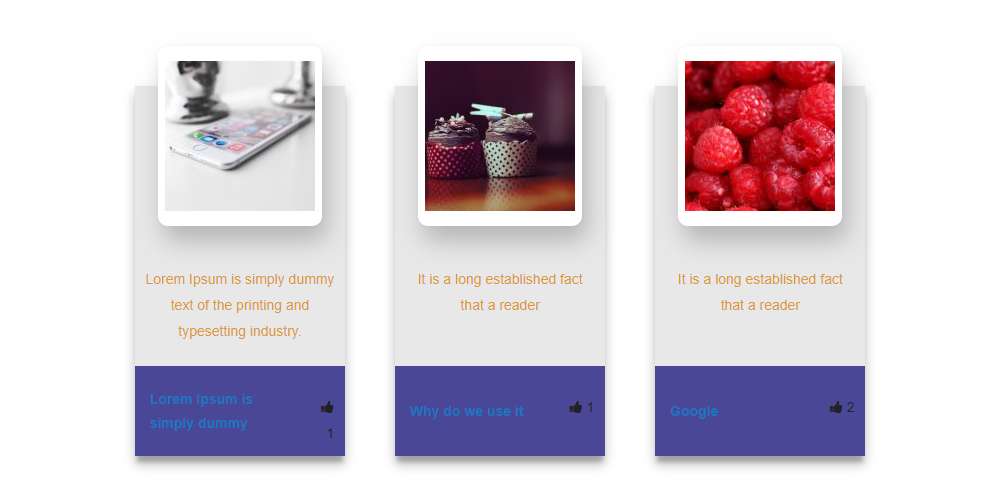
style-14
Support
To get priority support, please open a support ticket with us.
Any feedback or feature requests are most welcome. We will try to incorporate your valuable suggestions with our item.
Developed by Professional Web Design and Development Company QuantumCloud
Partner with us if you need any design or development help with your website!
Sources and Credits
We have shamelessly borrowed code and ideas from the following great open source projects (Thanks!):